Basic Setting
Disable cart page
This setting disables the WooCommerce cart page. When enabled, any attempt to access the cart page will redirect the customer directly to the checkout page. This streamlines the purchase process by skipping the cart review step.
Example: If a customer clicks “View Cart” after adding a product, they will be sent straight to the checkout instead of seeing the cart.
Enable single page checkout
This option enables a single page checkout experience, where the checkout page also displays the cart contents. Note: Enabling this will disable the “Change and Remove Quantity on checkout page” option found in the Checkout page tab.
Example: Customers see both their cart and checkout form on one page, making it easier to review and complete their order in one step.
Enable redirect on add to cart
When enabled, customers are redirected immediately after clicking the “Add to Cart” button. By default, this sends them to the checkout page, but you can customize the destination using other settings below.
Example: After adding a product, the customer is taken directly to checkout instead of staying on the product page.
Redirect to custom url
This setting allows you to redirect customers to a custom URL after adding a product to the cart. You can use this to send users to a category page, tag page, post, or even an external website.
Example: After adding a product, the customer is redirected to a special promotion page or a blog post.
Redirect to page
If “Enable redirect” is active, this setting lets you choose a specific WordPress page to redirect customers to after adding a product to the cart. If no page is selected, the default is the checkout page.
Example: After adding a product, the customer is redirected to a “Thank You” or “Special Offers” page.
Redirect to custom url (text field)
Here you can specify any custom URL for redirection after a product is added to the cart. This can be any page on your website or an external link.
Example: Enter “https://yourwebsite.com/sale” to send customers to your sale page after adding a product.
Disable continue shopping button
WooCommerce typically shows a “Continue Shopping” button after a product is added to the cart. Enabling this option removes that button, keeping users focused on the checkout process.
Example: After adding a product, the customer only sees the checkout option, not a prompt to continue shopping.
Don’t add product to cart when redirected to external website
If enabled, when the add to cart action is set to redirect to an external URL, the product will not be added to the WooCommerce cart. This is useful for affiliate products or external sales.
Example: Clicking “Add to Cart” for an affiliate product sends the customer to the partner site without adding the product to your cart.
Redirect empty cart to shop
When this option is enabled, customers who try to access the cart page while their cart is empty will be automatically redirected to the Shop page instead of seeing the empty cart message.
This helps improve user experience by guiding customers back to your products, encouraging them to continue shopping rather than leaving them on an empty cart page.
Quick View
Enable Quick View Button
This option lets you display a Quick View button on WooCommerce product archive and category pages. When activated, shoppers can instantly preview product details in a popup without navigating away from the current page, improving browsing speed and user experience.
Example: Enabling this shows a “Quick View” button beneath each product on the shop page, allowing customers to view product information in a modal window.
Text Shown Inside the Quick View Button
Customize the label inside the Quick View button to align with your store’s branding, marketing tone, or preferred language. Optimized button text can improve click-through rates and encourage customer interaction.
Example: Replace “Quick View” with “Preview Product,” “View Details,” or any call-to-action that matches your brand voice.
Quick View Popup Box Size
Set the width of the Quick View popup box as a percentage of the screen size. Adjusting this value controls how prominent the popup appears, helping optimize product visibility and design balance.
Example: Use 70% for a balanced modal size or 100% for a full-width experience.
Product Image Width
Define the width of the product image within the Quick View popup as a percentage. Optimizing image size ensures the right balance between visuals and product information for better conversion potential.
Example: Set to 30% for smaller images and more text space, or 50% for larger product visuals.
Background Color of Quick View Button
Choose a background color for the Quick View button to make it stand out and match your site’s design scheme. A well-chosen color can draw attention and boost engagement.
Example: Use #ee6443 for a bright orange CTA button or select a brand-specific color.
Text Color of Quick View Button
Set the font color for the Quick View button text to improve readability and maintain a cohesive look with your store’s theme.
Example: Apply #ffffff for white text on a dark or vibrant button background.
Background Color of Quick View Popup Box
Control the background color of the popup that appears when customers click the Quick View button. The right color choice can enhance readability and match your site’s aesthetics.
Example: Choose #FFFFFF for a clean white background that keeps focus on the product.
Text Color of Quick View Box Content
Adjust the text color inside the Quick View popup, ensuring product titles, descriptions, and other details are easy to read.
Example: Use #000000 for dark text on light backgrounds to maximize legibility.
Close Popup Background Color
Set the background color for the close button in the Quick View popup to make it easy for visitors to identify and close the modal.
Example: Apply #000000 for a dark close button background that contrasts with lighter designs.
Close Popup Icon Color
Define the color of the close icon inside the Quick View popup for improved visibility and accessibility.
Example: Use #ffffff for a white close icon on dark backgrounds.
Enable Lightbox
Activate a lightbox effect for product images in the Quick View popup. This allows shoppers to click an image and view a larger version in an overlay for a closer look at product details.
Example: When enabled, clicking the product image opens it in an enlarged, high-resolution overlay.
Popup Box Padding (px)
Specify padding inside the Quick View popup in pixels to control spacing between the content and popup border. Proper padding improves layout and visual comfort.
Example: Set to 10px for minimal spacing or 20px for a more spacious design.
Pop Up Box Open Animation
Select an animation style for the Quick View popup opening effect. Adding motion enhances the shopping experience and makes interactions feel smoother.
Example: Choose “fadeInUp” for a subtle upward fade effect or “bounceIn” for a more dynamic entrance.
Buy now Button
Buy Now Behavior
This setting determines how the WooCommerce Buy Now button functions. You can select either “Simple” or “Advanced” mode. In “Simple” mode, clicking Buy Now instantly redirects the shopper to the checkout page with the selected product in their cart. In “Advanced” mode, customers can keep other products in the cart but proceed to checkout with only the chosen product—similar to Amazon’s Buy Now feature.
Example: If a shopper has three products in their cart and clicks Buy Now for product A in “Advanced” mode, only product A is processed at checkout while products B and C remain in the cart.
Remove Other Products from Cart
When enabled, adding a product via the Buy Now button will clear all other products from the WooCommerce cart, leaving only the selected Buy Now product. This is ideal for one-click, single-product purchases.
Example: If products X and Y are in the cart and the shopper clicks Buy Now for product Z, the cart will contain only product Z.
Remove Even Same Product Previously in Cart
If activated, this ensures that any earlier instances of the same product are removed from the cart when using Buy Now, keeping only the newly added product instance.
Example: If product Q is already in the cart and the shopper clicks Buy Now for product Q, the old instance is removed and replaced with the new one.
Buy Now Button on Product Page
Enables a Buy Now button directly on single WooCommerce product pages, allowing customers to instantly purchase the product they are viewing without extra steps.
Example: On the product detail page, a Buy Now button is displayed beneath the Add to Cart button.
Label of the Buy Now Button
Customize the text label on the Buy Now button to align with your store branding, tone, or language preferences. Clear and engaging labels can boost conversions.
Example: Change “Buy Now” to “Quick Checkout” or “Instant Purchase.”
Position of the Button
Choose whether the Buy Now button appears before or after the Add to Cart button on product pages for optimal visibility.
Example: Place the Buy Now button above Add to Cart to make it more prominent.
Redirect to Cart/Checkout Page
Decide whether clicking Buy Now takes the customer to the cart page, directly to checkout, or keeps them on the current page. Direct-to-checkout can help reduce cart abandonment.
Example: Redirect customers straight to checkout for faster purchase completion.
Buy Now Button Size on Product Page
Set the width of the Buy Now button on product pages in pixels for optimal design and visibility.
Example: Use 250px width to make the button stand out more.
Buy Now Button on Product Archive Page
Enable the Buy Now button for WooCommerce shop and category archive pages so customers can instantly purchase without visiting the product detail page.
Example: Display Buy Now buttons beneath each product in a category listing.
Label of the Buy Now Button (Archive Page)
Customize the button text for archive pages to match your marketing style and encourage quick purchases.
Example: Use “Instant Buy” instead of “Buy Now” for category pages.
Position of the Button (Archive Page)
Set the Buy Now button placement on archive pages: before/after Add to Cart or before the product image to capture immediate attention.
Example: Place Buy Now before the product image to prioritize quick purchase actions.
Redirect to Cart/Checkout Page (Archive Page)
Specify where customers land after clicking Buy Now from archive pages—checkout, cart, or no redirect. Choosing checkout can speed up transactions.
Example: Redirect to the cart page so customers can review their order before finalizing.
Show Buy Now Option on Variable Products (Archive/Shop Page)
Enable Buy Now for variable products in archive listings. This will add the first variation to the cart. Be sure to set default values for all required attributes in WooCommerce product.
Example: Clicking Buy Now for a variable product adds its default variation directly to the cart.
Background Color of Buy Now Button
Customize the button’s background color to match your WooCommerce store theme or highlight the call-to-action for better engagement.
Example: Set the color to your brand’s primary shade for visual consistency.
Text Color of Buy Now Button
Set the text color of the Buy Now button to ensure readability and contrast with the background.
Example: White text (#ffffff) works well on dark or bold background colors.
Loading Animation on Buy Now Button Click
Enable a loading animation to provide visual feedback when a customer clicks Buy Now, improving user experience during order processing.
Example: Show a spinner animation on the button while processing the checkout action.
Add to Cart
Change Add to Cart Button Text
This option allows you to customize the label displayed on the WooCommerce “Add to Cart” button across your store. By personalizing this text, you can align it with your brand’s tone, marketing strategy, or conversion goals.
Example: Change the default text to “Buy Now” to create a sense of urgency and encourage quicker purchases.
Add to Cart Button Text
Specify the exact text you want to appear on the Add to Cart button. Leaving this field blank will display WooCommerce’s default “Add to cart” text. Custom button text can make the shopping experience more engaging and brand-consistent.
Example: Use “Quick Buy” to replace the default label and prompt faster customer action.
Select Options Button Text
Customize the text shown on archive pages for variable products (those with selectable attributes like size or color). If left empty, WooCommerce will use the default “Select Options” label.
Example: Replace “Select Options” with “Choose Your Style” to make the call-to-action more appealing.
Read More Button Text
Change the label for the button shown on archive pages when a product is out of stock. Leaving it blank will display WooCommerce’s default “Read More” text. This helps set clearer expectations for shoppers.
Example: Replace “Read More” with “Unavailable” to make stock status instantly clear.
Retain UTM Parameters in Add-to-Cart URL
By default, WooCommerce strips UTM tracking parameters from add-to-cart URLs, which can disrupt analytics and campaign tracking. Enabling this feature ensures UTM parameters are preserved, allowing accurate measurement of marketing performance and referral sources.
Example: If a customer clicks a Facebook ad containing a UTM parameter and adds a product to the cart, this setting will keep the UTM data in the URL for better campaign tracking in Google Analytics.
Checkout Setting
Change and Remove Quantity on checkout page
This setting allows you to enable options for customers to change the quantity of products and remove products directly from the checkout page. If single page checkout is enabled, these options are disabled to avoid conflicts. This only work for classing shortcode based checkout page only, It will not work with the Blocked based checkout page.
Example: If enabled, customers will see quantity fields and remove buttons next to each product during checkout.
Remove product option on checkout page
Shows a remove button before each product on the checkout page, allowing customers to remove items without leaving the checkout page. This only work for classing shortcode based checkout page only, It will not work with the Blocked based checkout page.
Example: A customer can click “Remove” next to a product to delete it from their order instantly.
Change quantity of product
Allows customers to change the quantity of products directly on the checkout page. This only work for classing shortcode based checkout page only, It will not work with the Blocked based checkout page.
Example: A customer can update the quantity from 1 to 3 for a product before placing the order.
Remove order comment
Removes the order comment field from the checkout form, simplifying the checkout process. This only work for classing shortcode based checkout page only, It will not work with the Blocked based checkout page.
Example: The “Order notes” field will not appear during checkout.
Remove coupon field from checkout page
Removes the “Have a Coupon?” field from the checkout page, preventing customers from applying coupons at checkout. This only work for classing shortcode based checkout page only, It will not work with the Blocked based checkout page.
Example: The coupon code input will not be visible during checkout.
Remove all the option of shipping field “Ship to a different address?”
Removes the “Ship to a different address?” option from the checkout page, so customers cannot specify an alternate shipping address. This only work for classing shortcode based checkout page only, It will not work with the Blocked based checkout page.
Example: Only the billing address will be used for shipping.
Link product name in checkout page
Makes the product name clickable on the checkout page, linking to the product detail page. This only work for classing shortcode based checkout page only, It will not work with the Blocked based checkout page.
Example: Clicking the product name opens its details in a new tab or window.
Open link in new tab
When enabled, product name links on the checkout page will open in a new browser tab. This only work for classing shortcode based checkout page only, It will not work with the Blocked based checkout page.
Example: Clicking a product name opens its page without leaving the checkout.
Remove billing fields
Allows you to select and remove specific billing fields from the checkout form. Multiple fields can be selected using Ctrl+Click. This only work for classing shortcode based checkout page only, It will not work with the Blocked based checkout page.
Example: Remove “Billing Company” and “Billing Phone” fields from checkout.
Remove shipping fields
Allows you to select and remove specific shipping fields from the checkout form. Multiple fields can be selected using Ctrl+Click. This only work for classing shortcode based checkout page only, It will not work with the Blocked based checkout page.
Example: Remove “Shipping Company” and “Shipping Address 2” fields from checkout.
Customer cant checkout without login
Forces customers to log in before they can complete the checkout process.
Example: Guest checkout is disabled; users must log in or register.
Message shown on login page
Customizes the message displayed on the login page when a user tries to checkout without being logged in.
Example: “Please log in or register to complete your purchase.”
Set custom thankyou page
Enables redirection to a custom thank you page after checkout is completed.
Example: After payment, users are redirected to a specific page instead of the default WooCommerce thank you page.
Set this page as thank you page
Selects a specific WordPress page to use as the thank you page after checkout. If “Set Custom Url” is chosen, you can specify a custom URL.
Example: Redirect users to a “Thank You” page with custom content after order completion.
Use this custom url as thankyou page
Allows you to specify a custom URL to redirect users to after checkout.
Example: Redirect users to http://yourwebsite.com/thank-you after placing an order.
Modify variable product present in cart
Enables an edit button next to variable products in the cart and checkout page. Clicking it redirects users to the product page to modify options, then returns them to checkout or cart.
Example: Edit product size or color directly from the cart or checkout.
Edit
Sets the text shown inside the edit button next to variable products in the cart and checkout page.
Example: The button will display “Edit” next to variable products.
Update product
Sets the text shown inside the update button on the product page when editing a variable product from the cart or checkout.
Example: The button will display “Update product” after editing product options.
Enable captcha on checkout page
Enables a CAPTCHA field on the checkout page to prevent spam and automated orders. This only work for classing shortcode based checkout page only, It will not work with the Blocked based checkout page.
Example: Users must enter a CAPTCHA code before placing an order.
Position of the captcha
Specifies the position of the CAPTCHA field on the checkout page using WooCommerce hook names.
Example: Place CAPTCHA before the order submit button.
Captcha field color scheme
Sets the color scheme for the CAPTCHA field on the checkout page.
Example: Change CAPTCHA background to light gray (#cccccc).
Captcha field error color scheme
Sets the color scheme for CAPTCHA error messages on the checkout page.
Example: Display error messages in red (#ff0000).
Select type of string to use in the captcha
Choose the type of characters used in the CAPTCHA: capital letters, small letters, numbers, or a mix.
Example: CAPTCHA can show only numbers or a mix of letters and numbers.
Captcha string length
Sets the number of characters in the CAPTCHA string.
Example: Require users to enter a 6-character CAPTCHA code.
Captcha field placeholder
Sets the placeholder text for the CAPTCHA input field.
Example: “Enter the CAPTCHA” appears inside the input box.
Captcha cant be left empty
Sets the error message shown when the CAPTCHA field is left empty.
Example: “Captcha cant be left empty” appears if the user skips the field.
Captcha does not match, please try again.
Sets the error message shown when the entered CAPTCHA does not match the generated code.
Example: “Captcha does not match, please try again.” appears if the code is incorrect.
Product Page Settings
These settings let you customize the Add to Cart, Buy Now, redirect, and thank you behavior for individual products or specific variations.
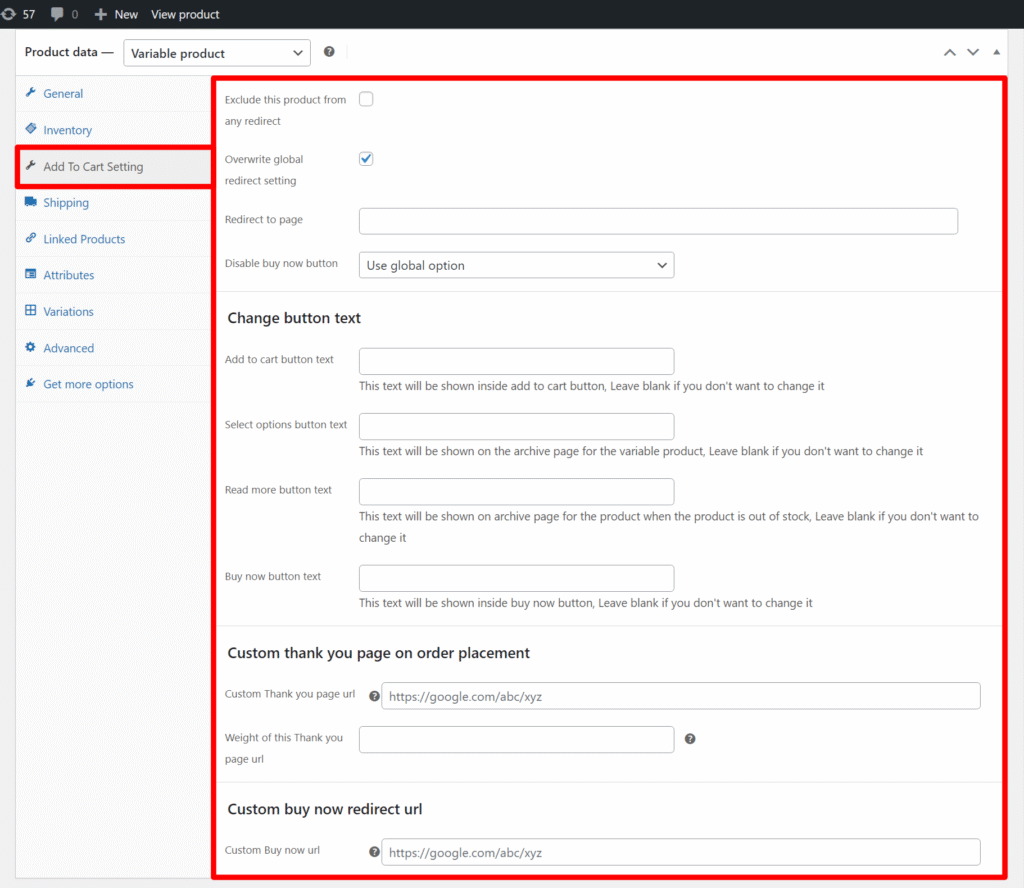
Add to Cart Redirect Settings (Product Level)
- Exclude this product from any redirect
Prevents this product from being affected by any global redirect settings. - Overwrite global redirect setting
Enable to apply a custom redirect for this product instead of the global setting. - Redirect to page
Enter the URL to redirect users after adding this product to the cart. - Disable buy now button
Choose whether to hide the Buy Now button for this product.
Change Button Text
Leave blank to keep the default text.
- Add to cart button text – Text displayed on the Add to Cart button.
- Select options button text – Text shown on the archive page for variable products.
- Read more button text – Text shown when the product is out of stock.
- Buy now button text – Text displayed on the Buy Now button.
Custom Thank You Page on Order Placement
- Custom Thank You page URL – Redirect customers here after purchase.
- Weight of this Thank You page URL – Priority level for using this page if multiple thank you pages are present in the order.
Example:
- Product A’s Thank You page weight: 5
- Product B’s Thank You page weight: 10
If a customer buys both Product A and Product B in the same order, the plugin will use Product B’s Thank You page because 10 is higher than 5.
Custom Buy Now Redirect URL
- Custom Buy Now URL – Redirect customers here when using the Buy Now button.
Variation-Level Settings
These settings appear inside each variation’s edit section for variable products.
- Manage redirect for this variation
Enable to set a unique redirect URL for this variation.
Redirect to page on add to cart – Enter the specific URL. - Set Thank You page for this variation
Enable to set a custom thank you page for this variation.
Thank you page URL – The URL to redirect after purchase.
Weight of this Thank You page URL – Priority level for this thank you page.