Shipping days
Shipping Days Settings
This section lets you define minimum and maximum shipping days for each shipping method in each shipping zone. These values are used by the plugin to calculate the Estimated Delivery Date.
Important: You must also set the Default Shipping Zone in the Basic Settings after configuring shipping days. Without this, estimates will not be shown.
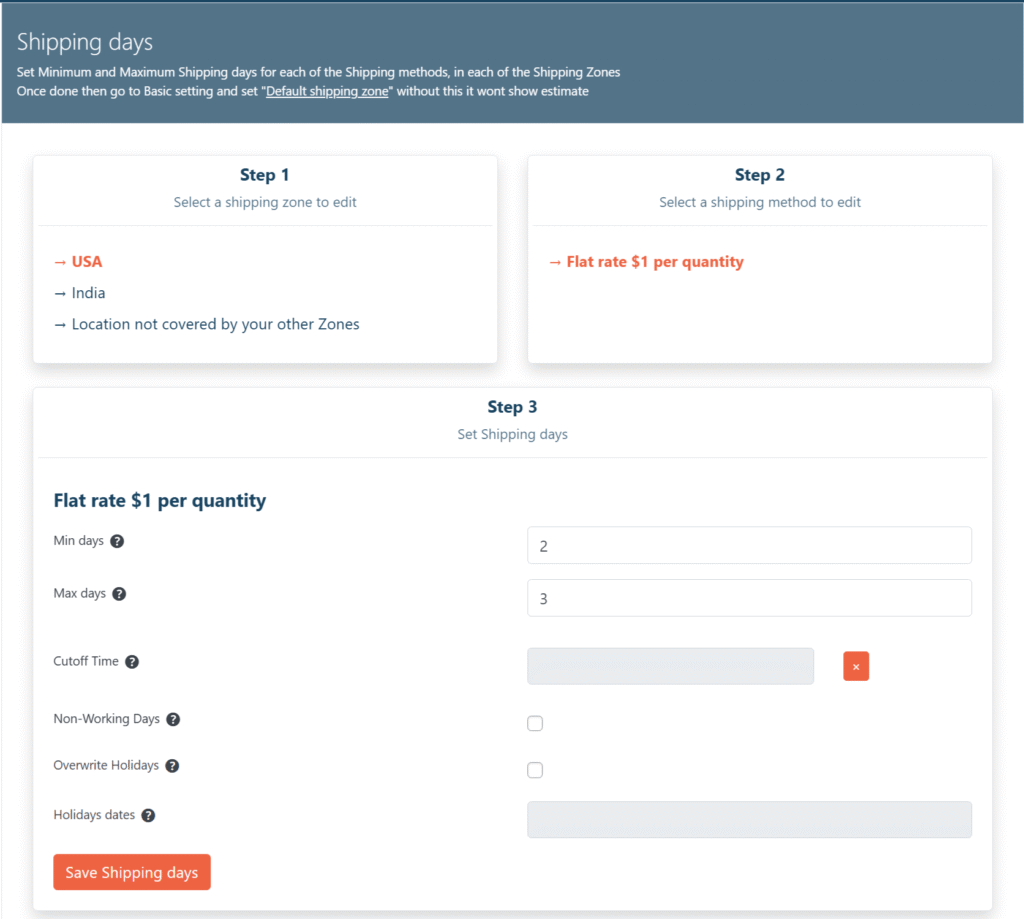
Step 1 – Select Shipping Zone
Choose the shipping zone (e.g., USA, India) for which you want to set shipping days.
Step 2 – Select Shipping Method
Pick the shipping method (e.g., Flat rate ) within the selected zone.
Step 3 – Set Shipping Days & Additional Rules
| Field | Description |
|---|---|
| Min Days | The minimum number of days required for delivery using this shipping method. |
| Max Days | The maximum number of days for delivery. The estimated delivery date will be calculated between Min and Max days. |
| Cutoff Time | The daily order cut-off time. Orders placed after this time will be considered as placed the next business day for calculation purposes. |
| Non-Working Days | Select the days of the week when shipping does not occur (e.g., Saturday, Sunday). These days are excluded from the delivery calculation. |
| Overwrite Holidays | Enable this if you want to manually define holidays that should override the default holiday list. |
| Holidays Dates | Specify holiday dates when shipping will not happen. These dates will be excluded from delivery date calculation. |
Default Shipping Days
The Default Shipping Days setting acts as a fallback when no minimum and maximum shipping days are defined for a specific shipping method. If you have set the value as 0 in the shipping method in that case default will not be used. Default is only used when the min, max values are left blank. Setting min, max to 0 means you don’t want to show the estimated date for that shipping method.
If a shipping method has no shipping days set:
- Without defaults set → The estimated delivery date will not be displayed.
- With defaults set → The plugin will use these default values to calculate the estimate.
| Field | Description |
|---|---|
| Default Minimum Days | The minimum number of days required for shipping. Used if no minimum is defined for the selected shipping method. |
| Default Maximum Days | The maximum number of days required for shipping. Used if no maximum is defined for the selected shipping method. |
Why Set Defaults?
- Ensures an estimated delivery date is always displayed, even if specific shipping days aren’t set.
- Acts as a safety net when you add new shipping methods but forget to configure their delivery days.
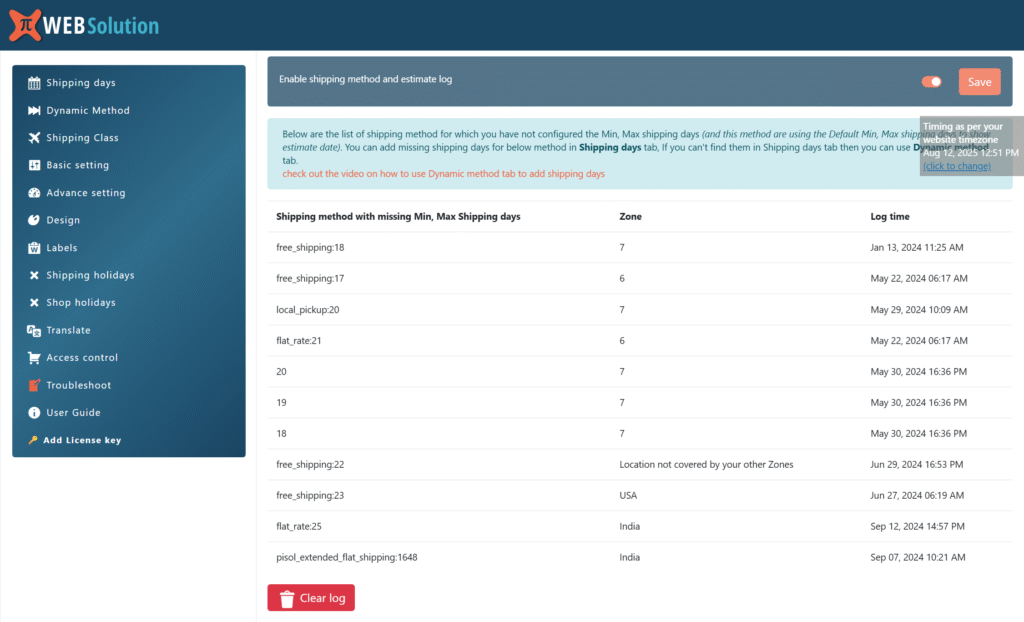
Troubleshooting Tip
Use the Troubleshoot option in the plugin to identify shipping methods that do not have defined minimum and maximum shipping days. This helps ensure that defaults are only used when necessary.
Example
- Default Minimum Days: 1
- Default Maximum Days: 3
- Shipping method “Free Shipping” has no days set → The estimate will be calculated as:
Current Date + 1 to 3 days
Got it — here’s the revised documentation for Default Product Preparation Days, making it clear that defaults are used only if no value is set at the product or shipping class level.
Default Product Preparation Days
The Default Product Preparation Days setting allows you to define preparation times that will be applied automatically only when no preparation time is set for the product or its shipping class.
This is useful if most of your products require the same preparation and backorder time, while still allowing exceptions for certain products.
How It Works
- If Min/Max preparation days are set for a product → those values take priority.
- If no values are set for the product but values are set for its shipping class → the shipping class values are used.
- If both product and shipping class values are blank → the defaults from this setting are used.
Fields
| Field | Description |
|---|---|
| Enable Default Product Preparation Days | Toggle ON to activate defaults for products where no preparation days are set. |
| Min Product Preparation Days | Default minimum preparation days. Used only if no value is set for the product or shipping class. |
| Max Product Preparation Days | Default maximum preparation days. Used only if no value is set for the product or shipping class. |
| Extra Time As | Choose whether extra backorder time is a single number of days or a range of days. |
| Extra Days for Backorder Products | Default extra days for backorders when using “Single days” mode. Used only if no value is set elsewhere. |
| Min Extra Days for Backorder Products | Default minimum extra days for backorders when using “Range of days” mode. |
| Max Extra Days for Backorder Products | Default maximum extra days for backorders when using “Range of days” mode. |
Example
- Product-specific preparation days: Blank
- Default Min Days: 2
- Default Max Days: 3
- Result: Preparation time = 2–3 days (from defaults).
Dynamic Shipping Methods
Some shipping methods (especially from 3rd-party plugins) do not appear in WooCommerce shipping zones. Because they are outside the standard zone system, you must configure their shipping days manually so that the estimated delivery date can be calculated.
This section allows you to:
- Assign Min/Max shipping days
- Set pickup cutoff times
- Define non-working days and shipping holidays
… specifically for these “dynamic” shipping methods.
How It Works in the Estimate Calculation
- When a customer chooses a shipping method at checkout, the plugin checks if it’s a standard WooCommerce zone method.
- If it’s not in a zone, the plugin looks for a matching Dynamic Shipping Method entry here.
- If found, it uses the Min/Max shipping days and other settings to calculate the delivery date.
- If not found, the estimate cannot be calculated for that method unless Default Shipping Days are set.
Fields & Options
| Field | Description |
|---|---|
| Shipping Method | Enter the system name of the shipping method or part of the system name |
| Zone | Select a zone for which this value should be used for this method, if you want this value to be user for this method all the time then select “All zone” |
| Match Type (Like / Exact) | Like matches any method name containing the keyword; Exact matches the full method ID. |
| Min Days / Max Days | Number of shipping days for this method. Both must be set for calculation. |
| Pickup Cutoff Time | Optional cutoff time for same-day processing. Orders placed after this time will start processing the next day. |
| Non-working Days | Select days of the week when shipping does not happen (e.g., Sundays, holidays). |
| Overwrite Global Shipping Holidays | If checked, you can enter specific holiday dates for this method that override global holidays. |
Example
- Method:
flat_rate+ USA + Like + Min: 3 / Max: 4 - Customer chooses a
flat_rate:US_Free_Shippingmethod at checkout. - Plugin sees “flat_rate” and “USA” match → uses 3–4 days shipping time in the calculation.
Important
- Both Min and Max shipping days must be set; otherwise, Default Shipping Days will be used if enabled.
- This tab is only needed for shipping methods not managed in WooCommerce zones. Zone-based methods should be configured in the main Shipping Days settings.
Show Shipping Method System name at Checkout
This option helps you identify the exact system name (ID) of the shipping method used at checkout. Many third-party shipping methods don’t appear in WooCommerce zones, and their IDs can be hard to find. Enabling this makes it easy to see the name you need to configure in the Dynamic Shipping Methods list below.
How It Works:
- When enabled, the shipping method’s internal system name is displayed alongside the method at checkout.
- This is only visible to you (site admin or logged-in testers), not to normal customers.
- You can copy this name and use it to set up rules in the Dynamic Shipping Methods table.
Shipping Class Settings
This section lets you configure product preparation time based on the shipping class assigned to products.
How it Works
- By default, preparation time is taken from product settings.
- If preparation time is set here (via shipping class), it will override the product-level settings for all products assigned to that shipping class.
- There is option in the product to disable shipping class overwrite for that product.

Basic Setting
Enable Estimated Delivery Date
Turn this setting on to display estimated delivery dates in your WooCommerce store. Disabling it will hide delivery estimates from customers without deactivating the plugin, so you can easily re-enable it later when needed.
Example: During a holiday season or inventory delay, you can temporarily disable delivery date estimates and turn them back on when operations return to normal.
Default Shipping Zone
Set a default WooCommerce shipping zone to use for calculating estimated delivery times before the customer provides their shipping address. This ensures an accurate estimate is shown even when WooCommerce can’t detect the shipping zone from the customer’s IP address.
Example: If most customers are located in New York, you can set that as the default zone so the delivery estimate is calculated for that location until the customer enters their actual address.
Default Shipping Method for Estimate Calculation
Choose the shipping method WooCommerce should use for the initial estimated delivery calculation before a customer selects a method. This default is applied until the shopper chooses their preferred shipping option.
Example: Select “Standard Shipping” so all preliminary delivery date estimates use that method.
Show Delivery Date Range
Enable this to display a range of delivery dates when products in the cart have different preparation or shipping times. If the minimum and maximum estimated delivery dates match, only a single date will be shown. So if the min and max shipping days are 2 to 3 days respectively, and this option is enabled in that case estimate date will be 2 to 3 days. (E.g. Mar 2, 2025 – Mar 3, 2025)
Best vs. Worst Case Delivery Estimate
If you are not showing a range in that case you can decide if you want to show best or worst case of delivery date.
Select whether to show the fastest possible delivery date (best case) or the slowest possible date (worst case) when multiple shipping methods are available. This helps you manage customer expectations according to your store’s policy.
Example: Choose “Best Estimate” to highlight the quickest delivery time or “Worst Estimate” for a more conservative promise.
Date Format
Pick how estimated delivery dates are displayed in your store. Choose a format that matches your locale or customer preferences for better clarity. There are 26 date format available apart from this there is a filter function available that allows you to add a custom date form of your choice.
add_filter('pisol_edd_option_filter_pi_general_date_format', function($format){
	return 'd l';
});
Example: Select “Y/m/d” to display the date as “2025/08/12”.
Daily Shipping Cut-Off Time
Set the last time of day orders are processed for shipping. Orders placed after this cut-off time will be shipped the following day, affecting the estimated delivery date. Leave blank if all orders are shipped starting the next day.
Example: If your shipping cut-off is 15:00 (3 PM), any order placed after that time will have its estimated delivery date calculated from the following business day.
Show Estimates for Back-Ordered Products
Enable or disable estimated delivery dates for products on backorder. If disabled, customers won’t see a delivery estimate for back-ordered items.
Example: Turn this off if you prefer not to commit to delivery dates for products awaiting restock.
Global Enable/Disable for All Products
Set the default behavior for showing delivery estimates across all products in your WooCommerce store. You can still override this setting for individual products.
Example: Enable it globally, but disable it for certain items that have unpredictable delivery times.
Enable for WooCommerce Block-Based Checkout
Activate this option if your Cart or Checkout pages are built using WooCommerce Blocks. This ensures estimated delivery dates display correctly in the block layout.
Regenerate Estimate When Order Status Changes
Enable this setting to recalculate the estimated delivery date whenever an order’s status changes. This ensures the estimate reflects the actual shipping start date.
Example: If a customer delays payment for two days, the delivery date updates based on the new confirmed order date.
Trigger Statuses for Estimate Recalculation
Choose which WooCommerce order statuses should trigger a recalculation of the estimated delivery date. Leave blank to keep the original estimate even when order statuses change.
Example: Add “Pending” so the date is recalculated when the order moves from Pending to Completed.
Show Calculation Information
Display details on how the estimated delivery date was calculated. You can show this info in the browser console, directly on the page, or both — useful for testing and troubleshooting. This detail are shown even to normal customer so you should turn off this setting once testing is done.
Example: Select “Show information below estimate date” to visually confirm the calculation logic.
Closed Shipping Days
Select the days of the week when shipping operations are closed. These days will be excluded from estimated delivery calculations.
Example: Select Saturday and Sunday if you don’t ship on weekends.
Shop Closure Days
Choose which days your shop is closed for business. If an order is placed on or near a shop closure day, it will affect the estimated delivery calculation.
Example: Select Sunday if your store is closed that day.
Advance setting
Show estimate on single product page
Enable this to display the estimated delivery date on the single product page. This helps customers know when they can expect their order before adding it to the cart.
Example: If enabled, a message like “Estimated delivery date August 15, 2025” will appear on the product page.
Load estimate by Ajax
When enabled, the estimated delivery date is loaded via Ajax, which helps avoid caching issues and ensures the estimate is always up-to-date.
Example: Changing product quantity updates the estimate without reloading the page.
Estimated date, Wording on product page
Customize the message shown alongside the estimated delivery date on the product page. You can use shortcodes like {date}, {days}, {icon}, etc., to dynamically insert values.
Example: “Estimated delivery date {date}” becomes “Estimated delivery date August 15, 2025”.
Estimated date, Wording on product page, for date range
Set the message template for when a date range is shown on the product page. Useful for products with variable delivery times.
Example: “Estimated delivery between {min_date} – {max_date}” becomes “Estimated delivery between August 15 – August 18”.
Back order estimated date wording on product page
Customize the message for products on back-order, showing their estimated delivery date.
Example: “Estimated delivery date {date}” for a back-ordered item.
Back order estimated date wording on product page, for date range
Set the template for back-ordered products when a date range is shown.
Example: “Estimated delivery between {min_date} – {max_date}” for a back-ordered item.
Position on single product page
Select where the estimate message appears on the product page (e.g., before or after the add to cart button).
Example: Show estimate above the add to cart button.
Consider product quantity field
Enable this to have the estimate calculation consider the quantity selected by the user, updating the estimate as quantity changes.
Example: Increasing quantity updates the delivery estimate if preparation days depend on quantity.
Show estimate on product loop page
Display the estimated delivery date on shop and category pages for each product.
Example: “Estimated delivery date August 15, 2025” shown under each product in the shop grid.
Load estimate by Ajax (loop)
Load estimates via Ajax on shop/category pages to avoid caching and keep estimates current.
Example: Estimates update dynamically as filters are applied.
Show Variable product estimate on archive page
Show the estimate for the first variation of variable products on archive pages. If disabled, no estimate is shown for variable products in the loop.
Example: “Estimated delivery date August 15, 2025” for the first variation.
Estimated date, Wording on category / shop page
Customize the message shown with the estimated delivery date on category/shop pages.
Example: “Estimated delivery date {date}” for products in the shop grid.
Estimated date, Wording on category / shop page, for date range
Set the template for date ranges on category/shop pages.
Example: “Estimated delivery between {min_date} – {max_date}”.
Back order estimated date, Wording on category / shop page
Customize the message for back-ordered products on category/shop pages.
Example: “Estimated delivery date {date}” for back-ordered items.
Back order estimated date wording on category / shop page, for date range
Set the template for back-ordered products with date ranges on category/shop pages.
Example: “Estimated delivery between {min_date} – {max_date}”.
Position on category / shop page
Choose where the estimate message appears on category/shop pages (e.g., after title, after image).
Example: Show estimate below the product title.
Show estimate on cart page for each product
Enable this to show the estimated delivery date for each product in the cart.
Example: “Estimated delivery date August 15, 2025” for each cart item.
Show estimate on checkout page for each product
Enable this to show the estimated delivery date for each product on the checkout page.
Example: “Estimated delivery date August 15, 2025” for each item at checkout.
Show estimate for complete order on checkout page
Show the overall estimated delivery date for the entire order on the checkout page, based on the product with the longest delivery time.
Example: If Product A is August 15 and Product B is August 18, the overall estimate is August 18.
Show estimate for complete order on cart page
Show the overall estimated delivery date for the entire cart, based on the product with the longest delivery time.
Example: Same as above, but on the cart page.
Estimated date, Wording on cart / checkout page
Customize the message shown with the estimated delivery date on cart and checkout pages.
Example: “Estimated delivery date {date}”.
Estimated date, Wording on cart / checkout page, for date range
Set the template for date ranges on cart and checkout pages.
Example: “Estimated delivery between {min_date} – {max_date}”.
Back order estimated date wording on cart / checkout page
Customize the message for back-ordered products on cart and checkout pages.
Example: “Estimated delivery date {date}” for back-ordered items.
Back order estimated date wording on cart / checkout page, for date range
Set the template for back-ordered products with date ranges on cart and checkout pages.
Example: “Estimated delivery between {min_date} – {max_date}”.
Don’t show estimate date in the order with this status
Select order statuses for which the estimated delivery date should not be shown in emails or order details.
Example: Hide estimates for cancelled or refunded orders.
Show estimate date for each product in stored order, email and order success page
Enable this to include the estimated delivery date for each product in order emails, backend order details, and the order success page.
Example: “Product A: August 15, Product B: August 18” in the order confirmation email.
Show estimate for complete order in order email
Show the overall estimated delivery date for the entire order in the order email.
Example: “Order estimated delivery date August 18, 2025”.
Complete order estimate position in order email
Choose where to display the overall order estimate in the order email (before or after the order table).
Example: Show estimate after the order details table.
Show estimate for complete order in order success page
Show the overall estimated delivery date for the entire order on the order success page.
Example: “Order estimated delivery date August 18, 2025” after checkout.
Calculation method used for order estimate
Select how the overall order estimate is calculated (e.g., show smallest and largest date, first and second largest, or product with longest estimate).
Example: “Show smallest and largest date” displays a range for the order estimate.
Overall estimate wording
Customize the message for the overall order estimate, using shortcodes like {date}, {days}, {week_days}.
Example: “Order estimated delivery date {date}”.
Overall estimate wording for range
Set the template for overall order estimate when a date range is shown.
Example: “Order estimated delivery between {min_date} – {max_date}”.
Add estimate date for each of the shipping method below their name on cart/checkout page
Enable this to show the estimated delivery date for each shipping method below its name on cart and checkout pages, helping users choose faster delivery options.
Example: “Delivery by August 15, 2025” under each shipping method.
Message template to show range of estimated time below each shipping method
Customize the message shown below each shipping method when a date range is available.
Example: “Delivery by August 15 – August 18”.
This template is used when Min and Max estimate date are same
Set the message template for cases where the minimum and maximum estimate dates are the same, avoiding redundant range messages.
Example: “Delivery by August 15, 2025” instead of “Delivery by August 15 – August 15”.
Enable special message to show for same day delivery
Enable this to show a special message when the estimated delivery is today.
Example: “Delivery by Today”.
Same day delivery message
Customize the message shown when the estimated delivery is today.
Example: “Delivery by Today”.
Enable special message to show for Tomorrow estimate
Enable this to show a special message when the estimated delivery is tomorrow.
Example: “Delivery by Tomorrow”.
Tomorrow delivery message
Customize the message shown when the estimated delivery is tomorrow.
Example: “Delivery by Tomorrow”.
Estimate message shown when product is out of stock
Set the message shown when a product is out of stock and no estimate can be provided.
Example: “Out of stock product”.
Message shown when user has not selected any variation
Set the message shown on variable product pages when no variation is selected.
Example: “Select a product variation to get estimate”.
Show default estimate for the variable product
Choose what estimate to show for variable products when no variation is selected (e.g., prompt to select variation, show first variation estimate, min/max preparation days).
Example: “Show message to select variation” or “Show estimate of variation with Minimum preparation time”.
Disable estimate for shipping method
Specify shipping method system names for which the estimate should be disabled. Useful for excluding certain shipping options from showing delivery estimates.
Example: Enter “flat_rate:23, free_shipping:33” to disable estimates for those methods.
Design
Background color of message
This setting allows you to choose the background color for the estimated delivery message container. You can set different colors for the message on the single product page, shop/category page, and cart/checkout page. This helps the message stand out and match your site’s design.
Example: Set the background color to #f0947e for a warm orange look, or choose any color that fits your theme.
Text color of message
This setting lets you select the color of the text displayed in the estimated delivery message. Adjusting the text color ensures readability against your chosen background color and helps maintain your site’s branding.
Example: Use #fff for white text on a dark background, or #000 for black text on a light background.
Text alignment
Choose how the estimated delivery message text is aligned within its container. Options include left, center, or right alignment. This helps you control the visual layout of the message on different pages.
Example: Select “Center” to center the message, or “Left” for a more traditional look.
Font size
Set the font size (in pixels) for the estimated delivery message. This allows you to make the message more prominent or subtle, depending on your preference and site design.
Example: Enter 12 for a standard size, or increase to 16 for better visibility.
Padding (px)
Configure the padding (space inside the container) for the estimated delivery message. You can set values for top/bottom and left/right padding to control how much space surrounds the message text.
Example: Set top/bottom to 6 and left/right to 6 for balanced spacing.
Border
Customize the border for each side of the message container. You can set the color and width for the top, right, bottom, and left borders individually, allowing for detailed styling.
Example: Use #cccccc with a width of 1px for a subtle border, or choose a bold color for emphasis.
Border Radius
Set the border radius for the message container to control how rounded the corners appear. This can help soften the look of the message box and match your site’s style.
Example: Enter 6 for slightly rounded corners, or increase for a more pill-shaped container.
Use the short code {icon} in order to insert this icon in product page message
This setting allows you to upload an icon image that can be inserted into the estimated delivery message using the {icon} shortcode. The icon will appear on product and product archive pages. For best results, use an image sized 30×30 pixels.
Example: Upload a truck icon and use {icon} in your message to visually indicate delivery information.
Label
Words for shortcode {week_days} {min_week_days} {max_week_days}
Singular for Week
This setting allows you to define the word used for a single week in the plugin’s delivery estimate shortcodes. By default, it is set to “week”. You can customize this to match your store’s language or terminology.
Example: If you set this to “semana”, the estimate will display “1 semana” instead of “1 week”.
Plural for Weeks
This setting lets you specify the word used for multiple weeks in delivery estimate shortcodes. The default value is “weeks”. Adjust this to suit your preferred language or phrasing.
Example: Setting this to “semanas” will show “2 semanas” instead of “2 weeks”.
Singular for Day
Use this setting to define the word for a single day in delivery estimate shortcodes. The default is “day”. You can change it to fit your store’s language or style.
Example: If you enter “día”, the estimate will display “1 día” instead of “1 day”.
Shop/Category estimate tooltip
This text will be shown as a tool tip on the Estimate message shown on the Shop and category page
Single product estimate tooltip
This text will be shown as a tool tip on the Estimate message shown on the single product page
Plural for Days
This setting allows you to set the word for multiple days in delivery estimate shortcodes. The default is “days”. Customize it as needed for your store.
Example: Setting this to “días” will show “3 días” instead of “3 days”.
Shipping Holidays
This setting allows you to mark specific dates when your shipping operations are closed, such as national holidays or company breaks. On these dates, no orders will be shipped, and they will be excluded from estimated delivery date calculations.
Why it matters: Adding shipping holidays ensures your customers receive accurate delivery estimates and prevents overpromising during non-operational days.
How it works: Simply click on the dates in the calendar to mark them as holidays. The selected dates will appear in the “Selected holiday dates” list. You can remove any date by deselecting it on the calendar or deleting it from the list.
Example: If your warehouse is closed from July 15 to July 18 for maintenance, select these dates in the calendar so delivery estimates automatically skip them.
Shop Holidays
This setting lets you define the dates when your entire shop is closed for orders, such as store-wide vacations, public holidays, or maintenance shutdowns. On these days, customers will not be able to place orders, or their orders will be scheduled for processing after the holiday period.
Why it matters: Setting shop holidays ensures customers are informed about order delays in advance, prevents order processing on non-working days, and helps manage expectations.
How it works: Select the holiday dates from the calendar. These dates will appear in the “Selected holiday dates” list. To remove a holiday, simply click on it again in the calendar or delete it from the list.
Example: If your shop will be closed for the New Year holiday from January 1 to January 3, adding these dates will stop order processing during that period and display accurate delivery times.
Translate
If your website is multilingual, this section allows you to translate all estimated delivery date messages into your preferred language. This ensures that customers see delivery information in the same language as the rest of your store, improving clarity and user experience.
Why it matters: Providing delivery estimates in the customer’s language builds trust and avoids confusion, especially for international stores.
How it works: Enter the translations for each message in the provided fields. The system will automatically display the translated version based on the customer’s selected language.
Example: If your store supports English and French, you can translate “Estimated Delivery: 5–7 days” into “Livraison estimée : 5–7 jours” for French-speaking customers.
Access Control
All shop manager to access plugin setting
This setting allows you to control whether users with the “Shop Manager” role can access and modify the plugin settings. If enabled, Shop Managers will be able to view and change all configuration options for the Estimate Delivery Date for WooCommerce Pro plugin. If disabled, only administrators (users with the “manage_options” capability) will have access to these settings.
Example: If you want your Shop Managers to handle delivery date configurations without giving them full admin rights, enable this option. They will then see and be able to edit the plugin settings in the WordPress dashboard.
Troubleshoot
If you are not seeing the estimate date on your website, then most common reason for this issue is you are getting assigned to a shipping method for which you have not yet configured the shipping days.
So setting a default shipping days help you to avoid this, but if you don’t want to set a default shipping days. In that case enabling the option “Enable shipping method and estimate log” helps you in finding the shipping method for which you haven’t configured the shipping days.
Product level setting
You will find this setting in the product edit page, under “Preparation time” tab
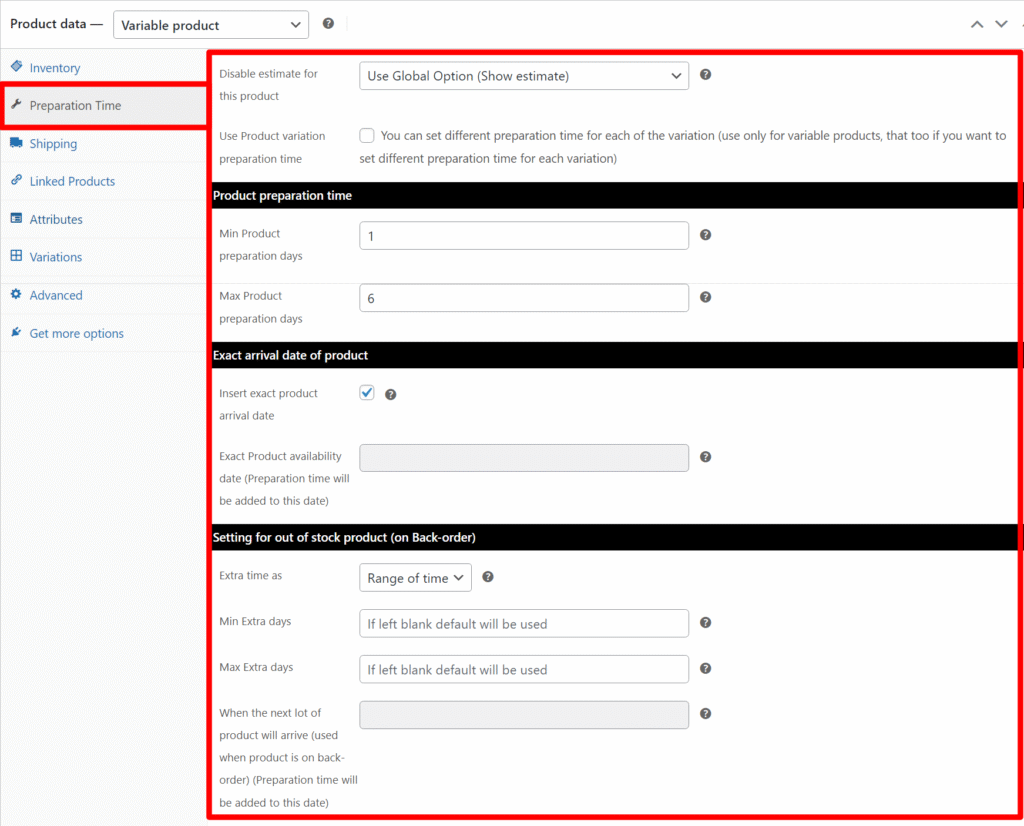
Disable Estimate for This Product
This option allows you to disable the delivery estimate for the selected product. You can choose:
- Use Global Option (Show estimate) – The system will follow the global settings for showing delivery estimates or not.
- Disable estimate – The delivery estimate will not be displayed for this product.
- Enable estimate – This will enable the estimate date for this product
Use Product Variation Preparation Time
Enable this option if you want to set a different preparation time for each variation of a variable product. If left unchecked, the same preparation time will apply to all variations.
Product Preparation Time
Define how many days it will take to prepare the product before it can be shipped. This time will be added to any shipping time when calculating the estimated delivery date.
- Min Product Preparation Days – The shortest possible preparation time for this product. (Default: Global setting will be used if left blank.)
- Max Product Preparation Days – The longest possible preparation time for this product. (Default: Global setting will be used if left blank.)
Exact Arrival Date of Product
If you know the exact date this product will be available, enable this option and set the date. The system will add the preparation time to this date when calculating the estimate.
- Insert Exact Product Arrival Date – Check to enable the date field.
- Exact Product Availability Date – Select the exact date when the product will be ready for shipping. Preparation time will still be added to this date.
Settings for Out-of-Stock Product (On Back-Order)
Configure how delivery estimates are calculated for products that are out of stock and available on back-order.
- Extra Time As – Choose whether extra time is set as a fixed number of days or as a range of days.
- Min Extra Days – Minimum number of extra days required for the product to become available again. (Default: Global setting will be used if left blank.)
- Max Extra Days – Maximum number of extra days required for the product to become available again. (Default: Global setting will be used if left blank.)
- Next Lot Arrival Date – Specify the exact date when the next batch of stock will arrive. Preparation time will be added to this date when calculating the estimate.
Disable Shipping Class Overwrite
If the product’s preparation time is already set through its assigned Shipping Class, but you want to apply a different preparation time for this specific product, enable this option.
When enabled, the preparation time you configure for this product will override the preparation time set at the shipping class level.
Tip: Use this when certain products within the same shipping class require more or less preparation time than the standard set for that class.