Order Fulfillment Type Settings
Enable Delivery, Pickup, or Both
Choose which fulfillment options to offer at checkout: only delivery, only pickup, or allow customers to choose between both.
Example: Select “Both” if you want customers to choose between home delivery and store pickup.
Default Fulfillment Type
Set the default selection (Delivery or Pickup) at checkout only when both options are enabled. This is applied the first time the user visits the checkout page. Once the user manually selects a fulfillment type, their preference will be stored.
Example: Choose “Pickup” if you want that pre-selected by default.
Hide Fulfillment Option if Only One Available
Say if you only support pickup orders, in that case showing a Fulfillment option of button is of no use so if you want you can hide it using this option. In that case only remaining field like date, time and pickup location will be visible.
Date and time setting
Enable Date Selection
Show the date selection field during checkout based on the selected fulfillment type — delivery, pickup, or both.
Example: If the customer selects “Pickup,” the pickup date field will be shown (if this setting is enabled).
Enable Time Selection
Show the time selection field during checkout for delivery, pickup, or both.
Note: This setting only works if date selection is also enabled for the chosen fulfillment type.
Example: If Date field is disabled for Delivery order, and you make Time available for Delivery and Pickup both, but since Date is disabled for Delivery Time will remain disabled for Delivery as well.
Preorder Days
Define how far into the future customers are allowed to schedule their delivery or pickup.
This setting limits the maximum selectable date in the date picker on the checkout page. It ensures that customers can’t place orders for dates too far ahead, which helps with operational planning and inventory management.
Example:
If you set this to 7, the customer will only be able to select a delivery or pickup date within the next 7 days from today (including today, depending on other settings like “Same Day Cutoff”).
Use Case:
Useful for stores that can’t manage long lead times, such as bakeries, grocery shops, or restaurants offering local delivery or same-week pickups.
How It Works with Order Preparation:
- The system calculates available dates by excluding the preparation period from the preorder window.
- Preparation time can be in minutes or full days, depending on your configuration.
Available dates range from:Today + Preparation Time up to Today + Preparation Time + Preorder Days
Available Dates Example (Assuming Today is July 20th)
This table explains how Preparation Time and Preorder Days affect the available delivery/pickup dates.
Formula:
Available Dates = July 20th + Preparation Time → up to July 20th + Preparation Time + Preorder Days
| Preparation Time | Preorder Days | Explanation | Available Dates |
|---|---|---|---|
| 0 minutes | 0 | No prep time, only same-day orders allowed | July 20th |
| 60 minutes | 0 | 1-hour prep, same-day still possible | July 20th |
| 1 day | 0 | 1 full day prep, only allow one date (post-prep) | July 21st |
| 1 day | 2 | Prep ends on July 21st, allow 2 days booking | July 21st, July 22nd |
| 2 days | 2 | Prep ends on July 22nd, allow 2 days booking | July 22nd, July 23rd |
| 3 days | 0 | Prep ends on July 23rd, only that day allowed | July 23rd |
| 0 days | 5 | No prep time, allow 5 days of booking starting today | July 20th to July 25th |
Set Different Preparation Time for Pickup & Delivery Order
Allows you to set separate preparation times for pickup and delivery orders.
🛠 How It Works:
- You can define preparation time in days and minutes.
- If days = 0, the minutes field is used to allow short preparation windows (e.g., 30 or 60 minutes).
- If days > 0, the minutes field is ignored — only full-day preparation time is considered.
- The minutes input allows up to 1440 minutes (24 hours). If you enter more than 1440 minutes — it will consider it to be 1440 minutes only.
✅ Example Scenarios:
- Delivery: 1 day (minutes ignored) → First available date = Tomorrow
- Pickup: 0 days + 45 minutes → First available time slot = 45 minutes from now (if same-day allowed)
⚠️ Important:
Do not enter more than 1440 minutes when using 0 days.
Same-Day Delivery/Pickup Cutoff Time
Set the latest time by which a customer can place a same-day delivery or pickup order.
This setting only applies when Order Preparation Days = 0 (i.e., same-day orders are allowed).
If the customer tries to place an order after the cutoff time, today will no longer be available, and the next available date will be shown instead.
Example:
- Cutoff Time:
2:00 PM - Customer visits at
1:45 PM→ Today is available - Customer visits at
2:15 PM→ Today is blocked, earliest available date is tomorrow
Next-Day Delivery/Pickup Cutoff Time
Set the latest time by which a customer can place a next-day delivery or pickup order.
This setting only applies when Order Preparation Days < 2 — meaning the customer is eligible to select the next day as an available option.
If the customer places an order after this cutoff time, the next-day option is blocked, and the available date will shift forward by one day.
Example:
- Order Preparation Days:
0 - Cutoff Time:
6:00 PM - Order placed at
5:30 PM→ Next day is available (e.g., July 21st) - Order placed at
6:15 PM→ Next day is blocked, earliest available date is July 22nd
Time setting
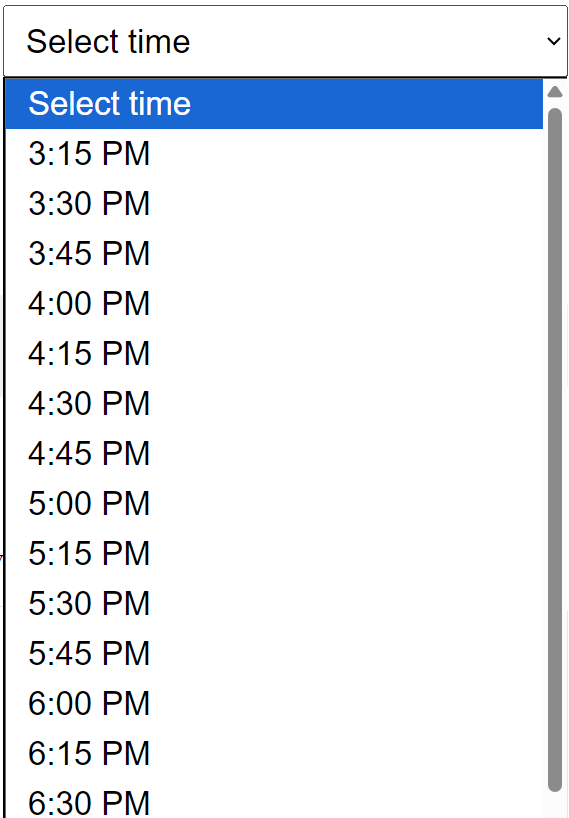
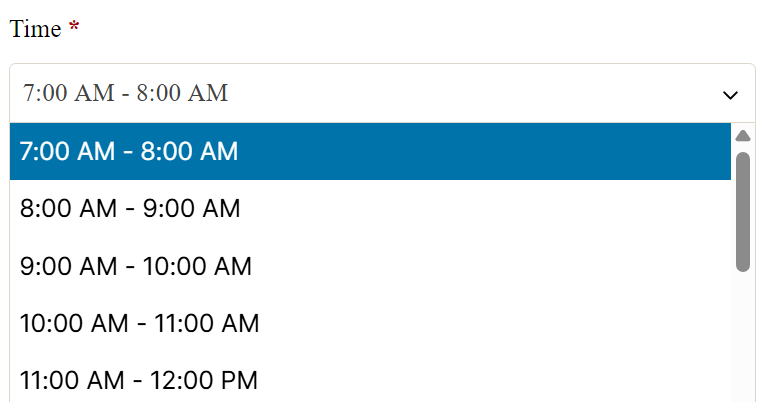
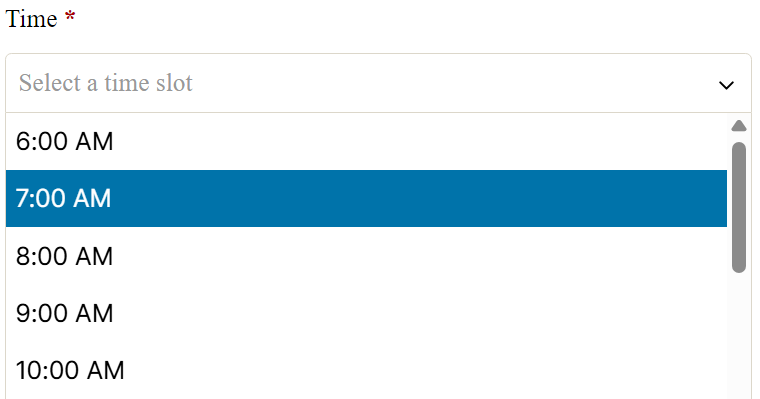
Delivery/Pickup Time Selection Style
Choose how customers should select the delivery or pickup time at checkout.
Options:
- Time Slot – Customers choose from predefined time ranges like
2 PM – 3 PM,3 PM – 4 PM.
Ideal when you want tighter control over fulfillment windows. - Single Time – Customers select a specific time point, such as
2 PM,3 PM,4 PM.
Useful when delivery/pickup can happen anytime within a flexible schedule.
Example:
- Restaurant offers 1-hour pickup windows → use Time Slot
- Clinic allows appointments at exact hours → use Single Time
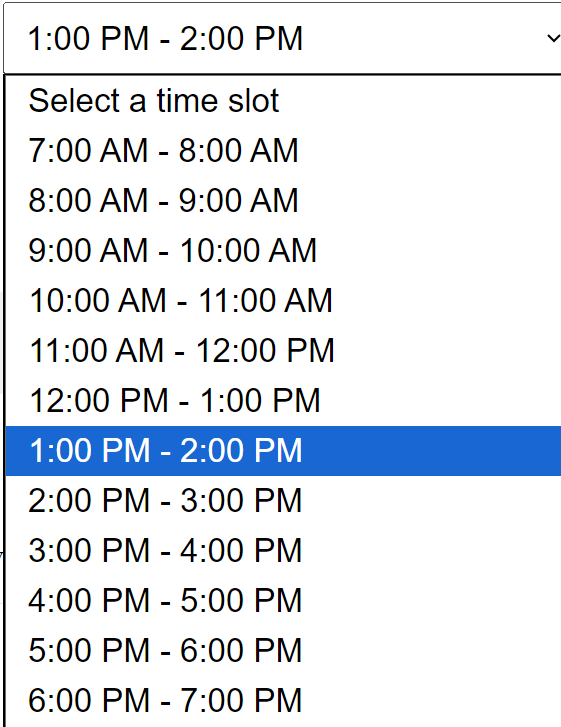
When to Remove a Time Slot
Choose when a time slot should be removed from the checkout options on the selected delivery/pickup date.
Options:
- At Slot Start Time – The slot becomes unavailable as soon as its start time is reached.
Example: The 2–3 PM slot disappears at 2:00 PM. - At Slot End Time – The slot remains visible and selectable until its end time.
Example: The 2–3 PM slot disappears at 3:00 PM.
Time Interval (in Minutes)
Set the gap between two time ranges when using the Single Time method.
This controls how frequently time options appear for selection.
Note: This setting is only applicable when “Single Time” is selected under “Delivery/Pickup Time Selection Style”. It does not apply to the “Time Slot” method (which uses predefined start–end ranges).
Example:
- If set to
60, available times might be:10:00 AM,11:00 AM,12:00 PM, etc. - If set to
30, times would be:10:00 AM,10:30 AM,11:00 AM,11:30 AM, etc.
Time Slot Availability Message
Customize the message shown to customers for each available time slot, helping them understand slot capacity in real time. If you don’t want to show this message then leave this field empty.
You can use the following shortcodes to display dynamic values:
[remaining_order]→ Number of orders still available for that slot[order_limit]→ Maximum number of orders allowed for that slot
Example Message Template:
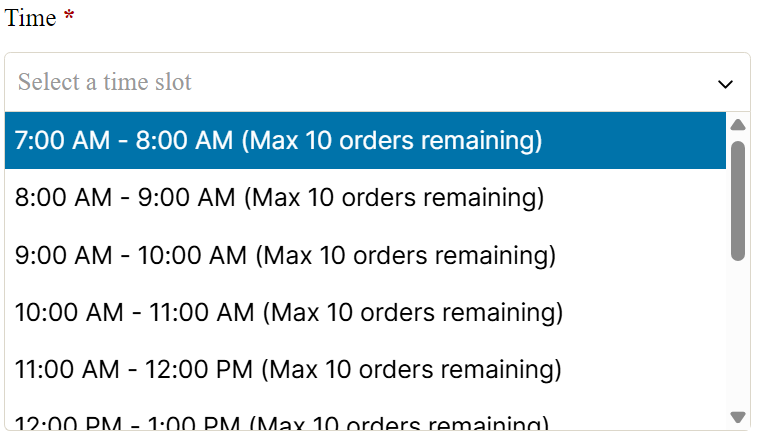
Use Case:
This creates urgency and transparency, especially for businesses with limited order handling capacity per time slot.
Auto Select Date and Time
This section controls whether the earliest available delivery or pickup date and time should be auto-selected when the checkout page loads:
- Auto-Select Date on Page Load:
Automatically selects the earliest available date so customers don’t have to pick one manually. They can still change it if needed. - Auto-Select Time When Available:
If a date is already selected (manually or automatically), the first available time slot will be auto-selected. Customers can still change it manually.
These options improve user experience by minimizing the steps required during checkout.
Checkout Setting
Position of Delivery Options on Checkout Page
Choose where the delivery/pickup fields (date, time, location) appear within the WooCommerce checkout form layout.
⚠️ Note: This setting only applies to classic checkout pages rendered using the
woocommerce_checkoutshortcode. It does not work with block-based checkout pages (e.g., from WooCommerce Blocks or custom block plugins).
Field Requirement Settings
Control which fields are mandatory during checkout based on the selected fulfillment type (Delivery or Pickup):
- Require Delivery Time at Checkout
Decide if the time selection must be filled. Options:- Not required
- Required in both pickup and delivery
- Required only in pickup
- Required only in delivery
- Require Delivery Date at Checkout
Decide if the date selection must be filled. Same option structure as above. Note: If date is optional, time will also remain optional. - Require Pickup Location Selection
Toggle whether selecting a pickup location is mandatory when pickup is chosen (only applies if pickup locations are enabled).
Field Visibility Settings Based on Order Type
These settings let you hide specific billing or shipping fields at checkout depending on whether the customer selects Pickup or Delivery:
- Remove Billing Fields for Pickup Orders
- Remove Shipping Fields for Pickup Orders
- Remove Billing Fields for Delivery Orders
- Remove Shipping Fields for Delivery Orders
You can selectively disable unnecessary fields to simplify the checkout experience for each fulfillment type.
⚠️ Note: These settings only work on checkout pages built using shortcodes. They are not compatible with WooCommerce’s block-based checkout.
Disable Plugin for Virtual Products in Cart
Control whether the delivery/pickup functionality should be disabled when virtual products are present in the cart:
- Don’t disable
→ Plugin always runs, regardless of product type. - If there is even a single virtual product in cart
→ Disable plugin as soon as any virtual product is added. - Disable if there are more virtual products than normal products
→ Plugin is disabled only when virtual products outnumber physical ones. - Disable if all are virtual products in cart
→ Plugin is disabled only when the entire cart contains virtual products.
Use this to avoid unnecessary delivery/pickup selection for intangible goods like downloads or services.
Allow Shipping Address for Pickup Orders
Enable this option if you want to show and allow the shipping address fields during checkout even when the customer selects Pickup as the fulfillment method.
By default, WooCommerce hides shipping address fields for pickup orders.
This setting overrides that behavior.
Useful if:
- You want to collect address info for record-keeping or invoicing.
- You offer pickup but still need to verify customer location.
- Some Payment gateway need shipping address field to allow order placement
Shipping Method Settings for Pickup
These settings control how shipping methods behave when a customer chooses Pickup at checkout.
You can choose from three shipping options for pickup orders:
- WooCommerce Local Pickup shipping method
- Uses WooCommerce’s built-in method
- Requires manual setup in each shipping zone (WooCommerce → Settings → Shipping)
- Local pickup provided by plugin
- Recommended for ease of use
- Automatically added to all zones
- Requires minimal configuration
- Don’t show any shipping option for pickup
- No shipping method is displayed for pickup orders
- Suitable if no rate or method is needed
Other related settings let you:
- Customize the label and method name
- Add a pickup fee
- Set tax rules
- Allow free shipping coupons to waive pickup fees
Payment Method Options
Control which payment methods should be available based on the selected delivery type (Delivery or Pickup) on the checkout page.
- Remove Payment Methods for Delivery
Select payment methods you want to hide when the user selects “Delivery”. - Remove Payment Methods for Pickup
Select payment methods you want to hide when the user selects “Pickup”.
Order Status for Order Limit
Select which WooCommerce order statuses should be counted toward the order limit for a time slot.
- Order status to consider for Order Limit
Only orders with the selected statuses will be included in the count for time slot availability.
This helps you avoid overbooking based on pending, processing, or completed orders — depending on your fulfillment logic.
Enable WooCommerce App Support
Enable this setting to make delivery date, time, and pickup location visible in the WooCommerce mobile app. This is needed as WooCommerce mobile app do not show Custom meta data in the order detail page in App.
- The plugin will automatically add these details to the order notes section.
- This ensures the information is displayed inside the WooCommerce app interface, which doesn’t show custom metadata otherwise.
Use this if you manage orders using the mobile app.
Hide Dates Without Available Time Slots
When this is enabled:
- Only dates with at least one available time slot will be shown in the date picker/calendar.
- Users won’t be able to select dates that have no valid delivery/pickup slots.
When disabled:
- All enabled dates will be shown, even if no time slots exist for some.
- Improves checkout performance by skipping time slot availability checks while rendering the calendar.
- If a customer selects a date with no slots, a warning message will be shown after selection.
Recommended:
- Enable for better UX.
- Disable if you face performance issues with large calendars or many time slot rules.
Enable Debugging
Turn this on to troubleshoot visibility issues with delivery/pickup dates or time slots.
- Logs detailed information about slot/date availability checks.
- Useful for identifying:
- Why a slot isn’t showing
- Which rule is causing a date to be excluded
- Log file location:
WooCommerce > Status > Logs >dtt-date-time-location
Recommended to disable in production unless actively debugging — it may slightly impact performance.
Checkout form labels
| Setting | Description |
|---|---|
| Show “Delivery type” label | Toggle to show or hide the “Delivery type” heading above the Pickup/Delivery selector. |
| Delivery type label | Label shown above the delivery type switcher (e.g., “Delivery Type”). |
| Date field label | Label shown above the date selector field (e.g., “Date”). |
| Date field placeholder | Text shown inside the date field when no date is selected (e.g., “Date”). |
| All dates are booked | Message shown when no delivery or pickup date is available (e.g., “All dates are booked”). |
| Time field label | Label shown above the time picker (e.g., “Time”). |
| Time field placeholder | Text shown inside the time field when no time is selected (e.g., “Select a time slot”). |
| When no time slot available | Message shown when there are no available time slots for a selected date (e.g., “All time slots booked for this date”). |
| Select pickup location field label | Label shown above the pickup location dropdown (e.g., “Select a pickup location”). |
| Select a pickup location | Placeholder shown inside the pickup location dropdown (e.g., “Select a pickup location”). |
| No pickup location warning msg | Warning displayed if no pickup location is available based on customer input (e.g., “No pickup location near by your area”). |
| Locate store | Button label shown inside pickup location field to let users locate nearby stores (e.g., “Locate Store”). |
| Modify no shipping method warning message on checkout page | Override WooCommerce’s default message when no shipping options are available. Useful for customizing the message when delivery/pickup doesn’t apply. |
Email / Order success page labels
| Setting | Description |
|---|---|
| Delivery type label | Label displayed for delivery type (e.g., Delivery or Pickup) in customer emails and the order success page. |
| Pickup location label | Label shown next to the selected pickup location in email/order success view. |
| Location map label | Label shown before the map preview (if enabled) in emails and on the thank-you page. |
| Click to view map | Text shown as a link/button for users to view the map in more detail. |
Date and Time Labels for Email / Order Success Page / Admin (Pickup Orders)
These settings let you customize the labels shown for pickup date and time in:
- Customer emails
- Order success (thank you) page
- WooCommerce admin order detail page
Date field label
Set the custom label for the pickup date.
Example: Pickup Date
Time field label
Set the custom label for the pickup time.
Example: Pickup Time
Date and Time Labels for Email / Order Success Page / Admin (Delivery Orders)
These settings allow you to customize the labels shown for delivery date and time in:
- Customer emails
- Order success (thank you) page
- WooCommerce admin order detail page
Date field label
Define the label for the delivery date.
Example: Delivery Date
Time field label
Define the label for the delivery time.
Example: Delivery Time
Extra Message for Date and Time Fields
This section allows you to show informative or instructional messages to customers regarding delivery or pickup timing. These messages can help clarify service terms, same-day cutoff conditions, or general expectations.
🔹 Message shown when delivery type is selected
Enter the custom message that will be shown when the customer selects Delivery as the order type.
Leave empty if no message is needed.
🔹 Message shown when pickup type is selected
Enter the custom message that will be shown when the customer selects Pickup as the order type.
Leave empty if no message is needed.
🔹 Position of the message
Choose where the message box should appear on the checkout page:
- Above the delivery type button
- Below the date and time fields
This helps position the message contextually for better visibility.
🔹 Message box background color
Set the background color of the message box (e.g., to highlight it in yellow, blue, etc.).
🔹 Message box text color
Set the text color to ensure readability over your chosen background.
This section supports basic formatting and improves user understanding during checkout.
Delivery Type Button on Checkout Form
This section allows you to fully customize the appearance and labeling of the Pickup and Delivery buttons shown on the checkout page.
🔹 Pickup label
Define the text to be displayed on the Pickup button. Example: “Pickup”, “Self-Collect”, etc.
🔹 Delivery label
Define the text to be displayed on the Delivery button. Example: “Delivery”, “Home Delivery”, etc.
🔹 Pickup / Delivery button background color
Set the background color of both buttons when no option is selected. Helps maintain a neutral look.
🔹 Pickup / Delivery active button background color
Set the background color of the selected button (either pickup or delivery). This highlights the user’s choice.
🔹 Pickup / Delivery button text color
Set the text color for both buttons when not selected.
🔹 Pickup / Delivery active button text color
Set the text color for the currently selected delivery type button.
This section gives you full visual control over the delivery method toggle for a better UX and to match your site’s design.
Position of the Details in the Email
Choose where the delivery/pickup date, time, and location details should appear in the customer’s order confirmation email.
🔹 Options include:
- Show at Order meta position (Recommended)
Displays the details along with other order metadata (like payment method, shipping method, etc.) for consistency and better formatting. - Show after Order Table
Displays the details below the product list in the email. Useful if you want it more prominently visible.
Recommendation:
Use “Show at Order meta position” for the cleanest layout and highest compatibility with email templates.
Position of the Details in the Order Page
Choose where the delivery/pickup date, time, and location details should appear on the:
- Order success (thank you) page
- Customer’s order detail page (My Account > Orders)
🔹 Available positions:
- After order detail, or Before order detail table
Displays the information alongside other order details like billing/shipping method, keeping the layout consistent. - Show after Order Table
Places the information after the list of ordered products. Useful if you want the fulfillment details to stand out more.
Use the position that best matches your theme’s styling and your user flow.
Select a Calendar Theme
Choose the visual style (theme) of the calendar displayed on the checkout page for selecting delivery or pickup dates.
Each theme changes the appearance of the calendar UI to better match your site’s design.
You can preview and test each calendar theme to see which one fits best.
Check available themes https://jqueryui.com/themeroller/#themeGallery
Order Detail Column in My Account > Orders Table
Set the column name that appears in the Orders table under My Account > Orders for each customer.
This column will display a brief summary of the selected delivery/pickup date, time, and location directly in the order list, so users don’t need to open each order to view fulfillment details.
Example values:
Delivery InfoPickup DetailsSchedule
Choose a name that clearly reflects the information shown in the column.
Here’s the full explanation for the WooCommerce Checkout Block section:
WooCommerce Checkout Block
These settings apply only if your site is using the WooCommerce Checkout Block instead of the classic shortcode-based checkout.
🔹 Date and Time Section Title
Set the heading that appears above the delivery/pickup date and time selection block.
Example: Choose Delivery Date & Time
🔹 First Select Date
Message shown when a time must be selected, but no date has been picked yet.
Example: Please select a date first.
🔹 First Select Pickup Location
Message shown when a time or date requires a pickup location to be selected first.
Example: Please select a pickup location before choosing date/time.
These help guide the customer through the selection process in the block-based checkout flow.
My Account – Save Pickup Point
This setting allows customers to save their preferred pickup location in their My Account area for faster checkout in future orders. Through this you can change the various title associated with this setting.
✅ What it does:
- Adds a saved pickup point field under My Account > Addresses or a custom section.
- During checkout, the saved pickup point can be auto-selected or shown as the default.
- Useful for returning customers who frequently choose the same location.
This improves convenience and streamlines the checkout process for regular pickup users.
Cart Page Settings
These settings control the visibility and position of the Delivery Type selector on the WooCommerce cart page.
🔹 Show Delivery Type Selector on Cart Page
Enable this to allow customers to choose between Delivery and Pickup directly from the cart page, before reaching checkout.
🔹 Position on Cart Page
Choose where to display the delivery type selector button.
It uses the following WooCommerce hooks:
Below the cart contentJust before the cart address columnBefore cart total
⚠️ Note:
- This may not work with some themes that don’t support these hooks.
- It also does not apply to Block-based cart pages.
If the button doesn’t appear, contact your theme developer for hook support.
🔹 Show Delivery Type Selector Label on Cart Page
Displays a text label next to the delivery type button for clarity.
Example: “Choose how you want to receive your order:”
Time Slot Settings
This section allows you to define and manage available time slots for delivery and pickup. Time slots give customers a controlled window for when they can expect their order or when they should pick it up.
General Time Slots
- You can create separate time slots for Pickup and Delivery.
- General time slots apply to all days of the week by default.
- If no specific day configuration is set, these general slots will be used.
Day-Specific Time Slots
- If you want to customize time slots for a specific day (e.g., Sunday or Wednesday), you can:
- Enable the checkbox next to that day.
- Add custom time slots for either Pickup or Delivery.
- Once set, these day-specific time slots will override the general ones for the selected day and fulfillment type.
Order Limit per Time Slot
- Set a maximum number of orders allowed in each time slot.
- Once the limit is reached, that slot becomes unavailable to other customers.
- This helps avoid overbooking and ensures smooth operations.
Example:
Time Slot: 2 PM – 3 PM, Order Limit: 10
→ Only 10 orders will be accepted in this slot.
Product Quantity Limit per Time Slot
- Define the maximum total quantity of items (across all orders) allowed in a time slot.
- Useful when your time-based capacity depends on volume rather than number of orders.
Example:
Time Slot: 2 PM – 3 PM, Quantity Limit: 50
→ If five orders come in with 10 items each, the slot becomes unavailable.
You can exclude a product from quantity limit, by default all product are configured to be counted for quantity limit. Buy you can exclude them from product General setting tab.
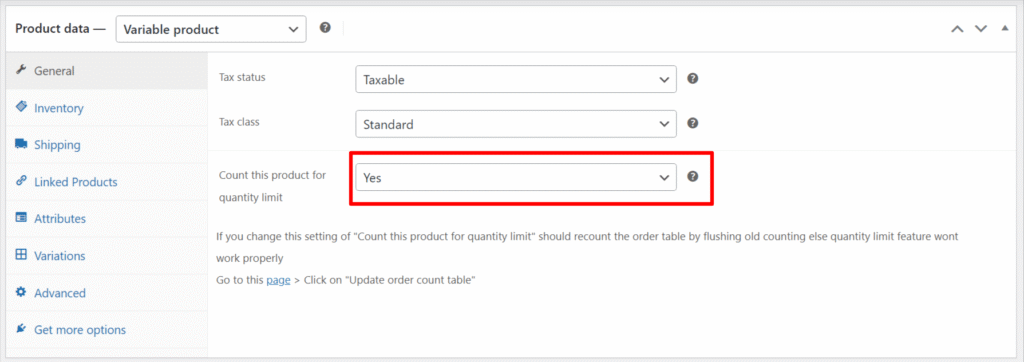
Note: If you change this setting of “Count this product for quantity limit” should recount the order table by flushing old counting else quantity limit feature won’t work properly. Rebuild order count table from this section Order count table > Manual Sync Options > Update order count table
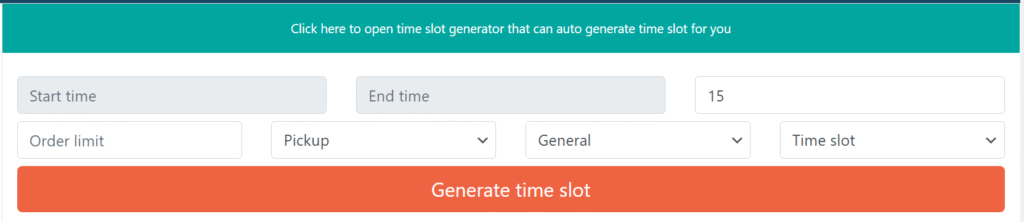
Time Slot Generator
Speed up slot creation with the Time Slot Generator:
- Provide:
- Start time (e.g., 10:00 AM)
- End time (e.g., 6:00 PM)
- Slot width (e.g., 60 minutes)
- Choose where to apply the generated slots:
- General (Pickup)
- General (Delivery)
- Specific day + Pickup (e.g., Sunday – Pickup)
- Specific day + Delivery (e.g., Sunday – Delivery)
This tool is ideal for quickly setting up uniform slot intervals without manually entering each one.
Single Time Setting
The General Time Range feature allows you to define your store’s working hours (start and end time), and the plugin will automatically generate a list of selectable time options at checkout based on a fixed interval.
🔹 How It Works
- You specify a Start Time and End Time (e.g., 9:00 AM – 6:00 PM).
- The plugin uses your global Time Interval setting (configured under
General Settings > Time Interval (in Minutes)) to split the time range into multiple selectable time points (e.g., every 30 or 60 minutes). - These generated time options will be displayed in the checkout time field when “Single Time” mode is selected in your time selection style.
🔹 Per-Day Configuration
- You can create different time ranges for different days of the week.
- If a specific day is not configured, the plugin falls back to the General Time Range.
🔹 Example
Settings:
- Start Time:
9:00 AM - End Time:
12:00 PM - Interval:
60 minutes
Generated Time Options at Checkout:
9:00 AM10:00 AM11:00 AM
This is ideal if you prefer using single time selections rather than fixed time slots (e.g., 2 PM – 3 PM). If you’re using time slots, refer to the Time Slot Settings section instead.
Order and Quantity Limit for the Day
This feature allows you to control the total number of orders or total product quantity allowed per day. It helps you manage daily operational capacity and avoid overload on specific days.
Per-Day Limit Configuration
You can define daily limits for each day of the week.
For example, set different limits for Monday, Saturday, etc., depending on your business schedule.
Limit Type
For each day, you can choose one of the following limit types:
- Delivery only
Limit applies only to Delivery orders. - Pickup only
Limit applies only to Pickup orders. - Combined (Pickup + Delivery)
A single limit applies to both order types combined.
This flexibility allows you to allocate resources differently depending on the fulfillment type.
Limit Options
- Order Limit
Maximum number of orders allowed for the selected day and fulfillment type. - Quantity Limit
Maximum number of products (total quantity) allowed to be ordered on that day.
Once the limit is reached, the day becomes unavailable for selection at checkout.
Example:
Saturday
- Limit Type: Combined
- Order Limit: 20
- Quantity Limit: 100
→ If 20 orders or 100 items (total across all orders) are placed for Saturday (Pickup or Delivery), Saturday becomes unavailable.
Use this feature to cap daily capacity and align with your team’s real-world fulfillment ability.
Order Limit on Date
This feature allows you to set custom order limits for specific calendar dates, overriding general or weekly limits. It is useful for managing high-demand or restricted service days, such as holidays, sales events, or maintenance windows.
🔹 What You Can Configure
For each selected specific date, you can define:
- Delivery Order Limit
Maximum number of delivery orders allowed on that date. - Pickup Order Limit
Maximum number of pickup orders allowed on that date. - Combined (Total) Order Limit
A global limit for all orders (pickup + delivery) placed for that date.
These settings give you full control over scheduling and capacity on important or exceptional days.
🔹 Behavior Notes
- If a date has a specific limit set here, it overrides the general day-of-week limits.
- Once the defined limit is reached, that date becomes unavailable at checkout.
- You can leave any of the fields empty if you don’t want to apply that specific limit type.
Quantity Limit on Date
This feature lets you set a custom product quantity limit for specific calendar dates, independent of general daily or slot-based quantity restrictions. It is particularly useful for controlling fulfillment load on busy or constrained days.
🔹 What You Can Configure
For each selected specific date, you can set:
- Delivery Quantity Limit
Maximum total quantity of items allowed for delivery orders on that date. - Pickup Quantity Limit
Maximum total quantity of items allowed for pickup orders on that date. - Combined (Total) Quantity Limit
A unified cap for total product quantity across both delivery and pickup.
This gives you fine-grained control over inventory, staffing, and operational limits for one-off dates.
🔹 Behavior Notes
- These limits apply per date, not per time slot.
- If a limit is reached, the date becomes unavailable at checkout for that fulfillment type.
- These limits override the general per-day quantity limits when defined.
Here’s the official-style documentation for the Pickup Location Settings section:
Pickup Location Settings
These settings allow you to customize how pickup locations are displayed and selected by customers on the checkout page.
🔹 Default Pickup Location
Select the default pickup location that will be auto-selected the first time a user visits the checkout page.
Useful when most customers prefer or use a specific location.
🔹 Show Pickup Location as Dropdown
Enable this to display all available pickup locations in a dropdown instead of showing full addresses as radio buttons.
Recommended if you have a large number of pickup locations to improve performance and layout clarity.
🔹 Show the Title in the Pickup Location Button
If enabled, the pickup location title (e.g., “Downtown Store”, “Main Warehouse”) will be shown on the location selection button for better identification.
🎨 Styling Options (Only for Radio Button Mode)
These do not apply if the dropdown mode is enabled.
| Setting | Description |
|---|---|
| Selected Location Background Color | Set the background color of the selected location’s radio button area. |
| Selected Location Text Color | Set the text color for the selected location. |
| Non-Selected Location Background Color | Set the background color for unselected pickup locations. |
| Non-Selected Location Text Color | Set the text color for unselected pickup locations. |
Use these styles to better match your site’s theme and improve selection visibility.
Pickup Locations
You can create multiple pickup locations, allowing customers to choose the one most convenient for them during checkout.
Each pickup location includes configurable options:
- Google Map Link
Provide a direct link to the pickup location on Google Maps to help customers easily find the store. - Store Manager Email
Specify an email address to receive order notifications for pickups from this location. Useful for notifying specific store managers directly. - Assign Shipping Zone
Link the pickup location to a specific WooCommerce shipping zone. This ensures that only relevant pickup points are shown based on the customer’s location.
Restrict Pickup Location by Product Category
This feature allows you to control which pickup locations appear at checkout based on the product categories in the customer’s cart.
It ensures that customers only see pickup locations that are valid for the products they are purchasing.
How It Works
When products from certain categories are in the cart, this setting will:
- Hide pickup locations that are not allowed for those product categories.
- Show only the pickup locations that are allowed (if configured).
Settings Overview
In each pickup location edit screen, you will find a new meta box titled “Restrict pickup location by product in cart” containing two options:
- Product categories allowed for this location
Select the product categories that are eligible for pickup from this location.
Only these categories will make this location visible at checkout.
Leave blank to allow all categories. - Product categories NOT allowed for this location
Select the product categories that are not eligible for pickup from this location.
If a product from one of these categories is in the cart, this pickup location will be hidden.
Note:
- Make sure products do not belong to multiple categories that have conflicting rules, as it may cause inconsistent behavior.
- If both fields are left empty, the location will be available for all products.
Example
When a customer adds a product from the Accessories category to the cart, Location 1 will be hidden during checkout.
Suppose you have two pickup locations: Location 1 and Location 2.
You add “Clothing > Accessories” under NOT allowed for Location 1.
Working Days of the Week
This section allows you to define which days of the week your store is operational for delivery and pickup.
🔹 We do Delivery on these Days
- Select the days on which you offer delivery.
- If your store delivers on all 7 days, you can leave this empty (no selection needed).
- If you only deliver on specific days (e.g., Monday to Friday), select those days.
🔹 We do Pickup on these Days
- Select the days on which pickup is available.
- If pickup is available every day, leave the field unselected.
- If pickup is restricted to certain days (e.g., weekends), select only those days.
This setting controls the availability of dates in the checkout calendar for each fulfillment type.
If a day is not selected for delivery or pickup, it will not appear as an option for the customer.
Working Months
This section allows you to define the months of the year during which delivery and pickup services are available. Months availability depend on preorder days setting. Say Right now it is July going on and you have configured preorder days as 7 days and in the Allowed months you insert December only, in that case there won’t be any available as you are only allowing order 7 days ahead in future.
🔹 We Do Delivery on These Months
Select the months during which you offer delivery.
- If delivery is available throughout the year, leave this unselected.
- If delivery is seasonal (e.g., only available in winter months), select only the applicable months.
🔹 We Do Pickup on These Months
- Select the months during which you offer pickup.
- Leave it empty if pickup is available in all months.
- If pickup is offered seasonally (e.g., summer only), select the relevant months.
Disable Pickup on These Dates
Use this setting to block pickup availability on specific calendar dates, regardless of your normal working days or months.
🔹 What It Does
- Prevents customers from selecting pickup for the listed dates at checkout.
- Overrides all other pickup availability settings (working days, months, time slots, etc.).
- Useful for holidays, maintenance days, or staff unavailability.
🔹 How to Use:
- Select one or more calendar dates where pickup should be disabled.
- These dates will not be available for pickup during checkout.
🛑 Note: This only disables pickup. Delivery remains unaffected unless separately restricted.
Disable Delivery on These Dates
Use this setting to block delivery availability on specific calendar dates, regardless of your normal delivery schedule.
🔹 What It Does
- Prevents customers from selecting delivery for the selected dates.
- Overrides all other delivery-related settings such as working days, working months, time slots, and order limits.
- Ideal for planned non-delivery days like holidays, system shutdowns, or staff shortages.
🔹 How to Use:
- Select the specific dates on which delivery should be disabled.
- Those dates will no longer appear as available options in the checkout calendar for delivery.
⚠️ Note: This setting affects only delivery. Pickup remains active unless also disabled.
Special Pickup on These Dates
This setting allows you to force-enable pickup on specific dates, regardless of your regular schedule or restrictions.
🔹 What It Does
- Overrides weekly pickup holidays – Pickup will be available on these dates even if the day is usually disabled (e.g., Sunday).
- Ignores Preorder Days setting – These dates will still appear even if they fall outside your allowed preorder range.
This is ideal for advance scheduling or special event handling, like opening up Christmas pickups before they normally become selectable.
🔹 Use Case Example
- Your preorder window is 5 days and pickups don’t run on Sundays.
- You want to allow pre-Christmas pickups on December 25 (a Sunday), starting from the beginning of the month.
→ Just add Dec 25 to this list and it will appear as available, ignoring both restrictions.
Force Only Special Date Pickup Orders
When this option is enabled, customers will only be allowed to choose pickup dates that are listed under “Special Pickup on These Dates.”
🔹 What It Does
- Disables all regular pickup options (days of the week, months, general calendar availability).
- Only the special dates you’ve explicitly added under Special Pickup on These Dates will be shown in the calendar.
- Useful when you’re accepting pickup orders only for specific events or limited dates.
🔹 Example Use Case
You’re running a holiday pre-order campaign, and you want customers to only pick up on December 24 or December 25 — no other dates should be available.
Special Delivery on These Dates
Use this setting to enable delivery on specific calendar dates, even if those dates are normally unavailable due to:
- Non-working delivery days (weekly holidays)
- Preorder day restrictions
🔹 What It Does
- Overrides regular delivery schedule — allows delivery on selected dates even if the day is normally disabled.
- Bypasses preorder window — customers can place delivery orders for these dates, even if they fall outside the defined preorder range.
Force Only Special Date Delivery Orders
When enabled, this setting restricts delivery orders to only the dates listed under Special Delivery on These Dates.
🔹 What It Does
- Disables all other delivery options based on day-of-week, month, or preorder logic.
- Customers will only see the explicitly listed dates for delivery at checkout.
🔹 Use Case Example
You’re running a limited-time delivery campaign for pre-ordering cakes only on December 24–25.
→ Add those dates under Special Delivery on These Dates and enable this setting.
→ No other delivery dates will be available.
⚠️ This affects only delivery orders. Pickup dates will follow their own configuration.
Access Control of Plugin
This section lets you define whether Shop Managers can access and/or modify plugin settings, and if yes, which parts they are allowed to change.
All Shop Manager to Access Plugin Setting
Toggle: ON/OFF
When enabled, users with the Shop Manager role can view and interact with the plugin settings.
- ✅ ON: Shop Managers can view and access plugin settings.
- ❌ OFF: Shop Managers cannot access the plugin configuration page.
Which Setting Shop Manager Can Change
Even if Shop Managers can access the settings, you can control exactly which settings they can modify.
Only the settings explicitly selected here can be edited. All other settings will be visible but read-only.
Available permissions include:
General settingLabelsOrder limit by dayOrder limit by dateCart pageTime SlotTime rangePickup locationDate setting
⚠️ Tip: Use this to delegate limited control to store staff without giving full administrative access.
Advanced Order Counting for Order Limit
This section is designed to optimize order limit calculations by maintaining a separate count table, improving performance for stores handling large order volumes.
Use Advanced Order Counting
Toggle: ON/OFF
When enabled, the plugin stores order counts in a dedicated table, reducing database load and significantly improving performance when using the Order Limit feature.
- ✅ ON: Enables optimized counting via a separate table.
- ❌ OFF: Uses standard WooCommerce queries to count orders.
Recommended for stores with high traffic or frequent order limit usage.
Sync Speed
Field: Numeric input
Controls how many orders are synced at once into the advanced count table.
- This is a database-intensive process. Higher values may speed up syncing but can temporarily impact site performance during the sync.
- For example, a value of 6 means 6 orders will be added per cycle.
⚠️ Tip: Start with a lower value if you’re experiencing site lag during syncing.
Order Sync Setting
This section ensures your advanced order count table is up to date. It helps verify, manually trigger, and manage syncing of WooCommerce orders into the plugin’s dedicated count table used for order limit calculations.
Order Count Table Status
Button: Order count table status
Use this to check whether all WooCommerce orders are included in the plugin’s advanced order count table. Useful for diagnosing discrepancies in order limits.
Manual Sync Options
You can manually update or resync old orders to the order count table. This is useful during initial setup or after migrating/importing orders.
- ✅ Flush and Recount Again
When checked, the plugin will clear existing entries in the count table and rebuild from scratch, ensuring full accuracy. - 🔘 Update Order Count Table
Starts syncing immediately in the current request. Suitable for small stores or testing. - 🔘 Update Order Count Table in Background
Recommended for large stores. This will run the sync process asynchronously in the background, preventing admin slowdowns or timeouts.
This setting is essential for accurate time slot and order limit enforcement when using advanced order counting.
ICS File to Be Added in Email
ICS files (calendar invite files) can be automatically attached to WooCommerce emails for delivery and pickup orders. These files allow both customers and admins to import the order as calendar events into apps like Google Calendar, Outlook, etc.
Add ICS File Attachment
Enable this to include an .ics calendar file as an attachment to the order email. Customers can then import this event into their calendar.
Note: Plain ICS format; compatible with most calendar applications.
ICS File Detail for Customer Email
Customize the ICS file content that is sent to the customer.
- ICS Summary for Delivery Order
Short plain text shown as the event title.
Example:Delivery for your order {order_no} - ICS Summary for Pickup Order
Example:Pickup your order {order_no} - ICS Description for Delivery Order
Full text shown in the calendar event description.
Example:Delivery for your order {order_no} - ICS Description for Pickup Order
Example:Pickup your order {order_no} - ICS Add Order Details
When enabled, the ICS description will also include product details and a link to the order detail page.
ICS File Detail for Admin Email
Configure the ICS file sent to admin users (store manager or site admin).
- ICS Summary for Delivery Order
Example:Following order {order_no} is to be delivered - ICS Summary for Pickup Order
Example:Following order {order_no} will be picked up - ICS Description for Delivery Order
Same as summary, but placed in the description field. - ICS Description for Pickup Order
Same as summary, but for pickup events. - ICS Add Order Details (Admin)
Add item details and order page URL in the admin ICS file.
Use this section to improve fulfillment and customer experience by keeping order timelines synchronized with their calendar systems.