Shipping date setup
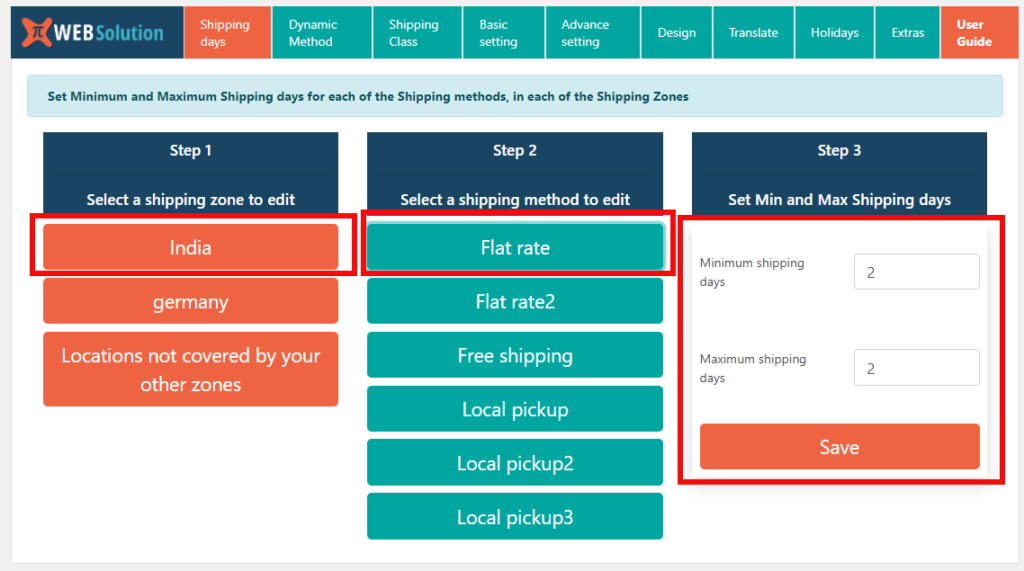
1) Make sure you have set Min, Max shipping days for all the shipping method in each of the shipping zones
- select a shipping zone
- select each of the shipping methods inside that selected shipping zone and set Min, Max shipping days for that method,
- you need to set this for each of the shipping methods on the site (if any method is left out and the user select that method then estimate will not be shown for that method)
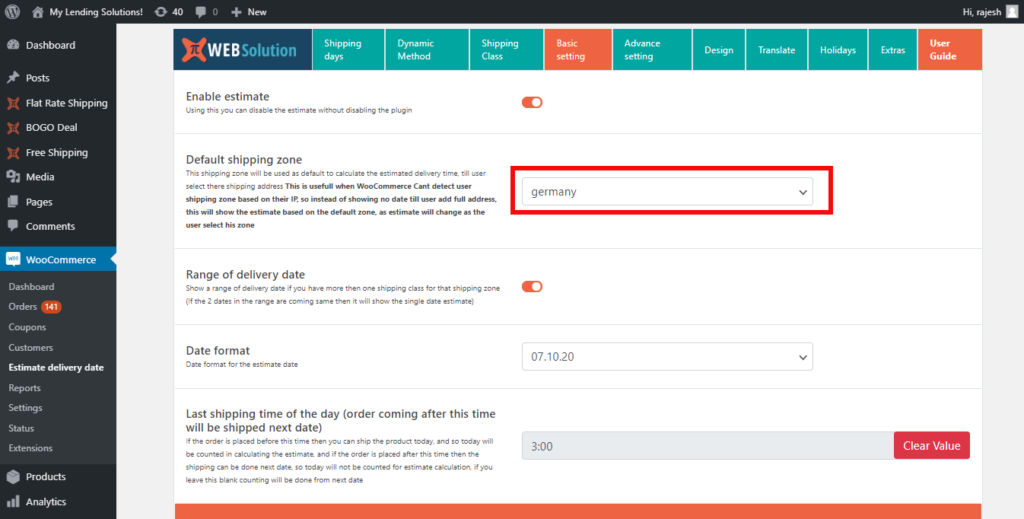
2) Select a default zone, whose estimate will be shown when Woocommerce can’t assign shipping zone to user based on the IP address then this default zone estimate will be shown
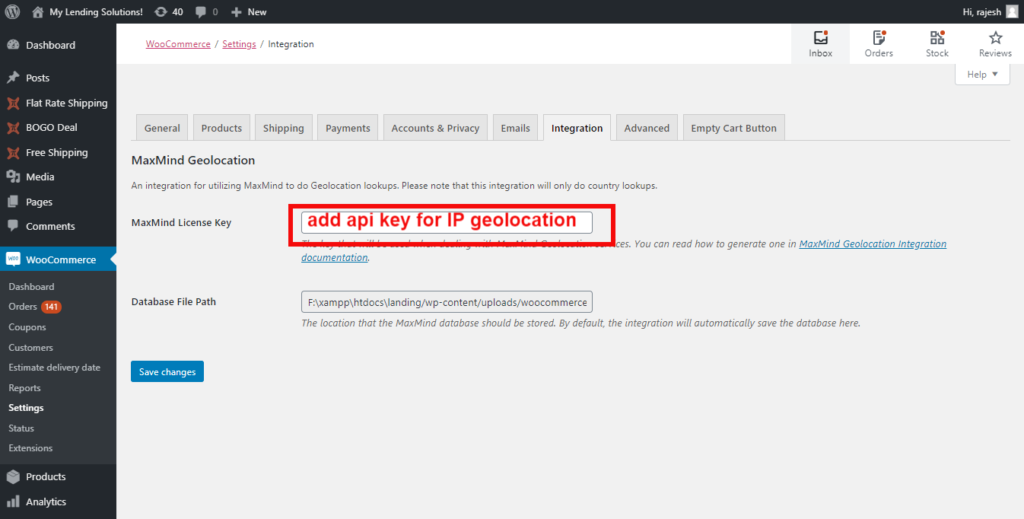
3) Make sure you have configured the MaxMind API Key in Woocommerce > settings > Integration
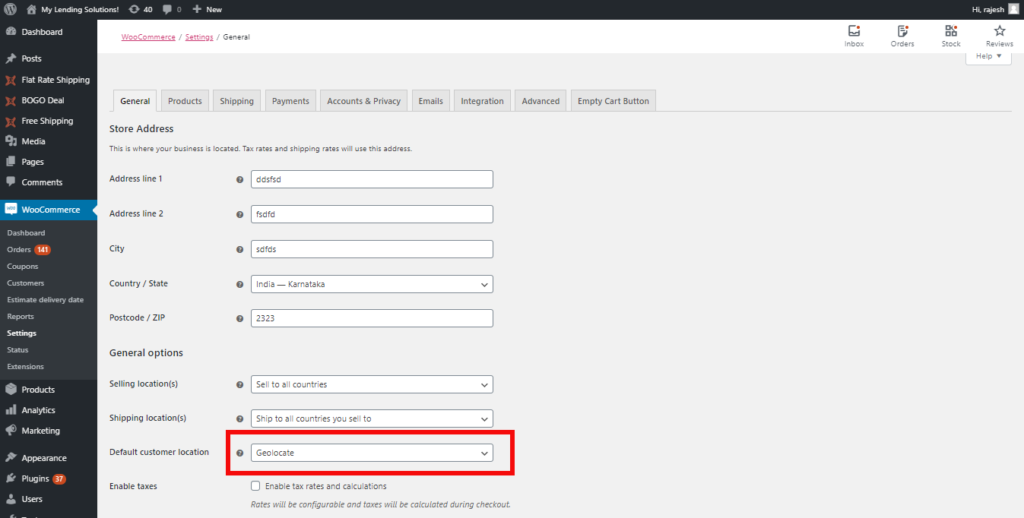
4) Go to Woocommerce > General > Default customer location (is set to “Geolocation”)
5) If you are using any Dynamic shipping method (added by some 3rd party plugin other then Woocommerce that are not linked to WooCommerce zone) then you need to set Min, Max shipping days for the dynamic method from the “Dynamic Method ” tab of the plugin watch this video it explains how to set Min Max for Dynamic method https://www.youtube.com/watch?v=UVfrIsdO4q0&feature=emb_title
There is an option to view the system name of the shipping mehtod in the Dynamic Method tab, checkout this video on how this option will help https://youtu.be/FKeSkDLfSKI

Why to set Default Min, Max shipping days?
If you miss out on setting Min, Max shipping days for any of the shipping method in your website then estimate will not be shown for such shipping methods. To avoid not showing estimate date you need to set this default shipping days.
If you have set this Default Min, Max shipping days then this will be used to calculate the estimate date for the shipping method for which you have not configured the shipping days
You can use Troubleshoot option in our plugin that help you to find out all the shipping method in your site for which you have not set the Min, Max shipping days. that way you can make sure that plugin will never have to use this Default shipping days value
Product preparation time: (PRO)
You can set product preparation days (Time: means the number of days, if your product takes 12 hr to make you have to enter 1 day ) for the individual product (in product edit form in each product)
This product preparation time is added to the shipping time given by your shipping company to give an estimated time
If you have a large number of products this can be time-consuming, so we have a Quick edit option for this “Product preparation time” field
If you have a large number of products and you want to update the product preparation time using CSV import then you can do that using the WooCommerce built-in Import/Export feature
Just follow the instruction given in here
https://docs.woocommerce.com/document/product-csv-importer-exporter/
and the Custom field name that stores the product preparation time is “product_preparation_time“

Preparation days for the variable product (pro)
You can set a different preparation day for each of the variations in a variable product
Or you can set one preparation days for all the variation in a product
If you are setting preparation days on each variation then it won’t show the estimated time on the product loop page, it will only show the time once the user comes to the product page and select some variation


Default shipping zone:
You have to insert minimum and maximum delivery days for each of the shipping class.
You have to select one shipping zone as the default shipping zone in your plugin setting. without this, we cant decide the shipping zone of the customer and cant show the estimate.
So when you select one shipping zone as default we do the calculation based on that shipping zone till the time customer select his own shipping zone
This default shipping zone is selected from the option Default shipping zone inside the Basic setting tab
Show the best/worst estimate delivery time
Using this you can either show the minimum time that will be taken to deliver or the maximum time that will be taken for delivery.
Shipping zone not selected: when the customer has not selected the shipping zone then it will extract all the shipping classes from the default shipping zone that you selected in the above setting.
If you have selected a minimum estimate, then it will take out the minimum number from the shipping class and use the smallest to calculate the shipping date
Shipping zone is selected: If the shipping zone is selected by the customer, then it will extract the minimum and maximum days from that particular shipping class and show either minimum or the maximum one based on your selection
Date format:
Free version only support one date format that is Year/month/date
PRO version offers around 9 different date formats
A range of delivery date:
This Shows a range of delivery date, with Best and Worst estimate.
E.G: Estimated delivery between March 21 – March 26
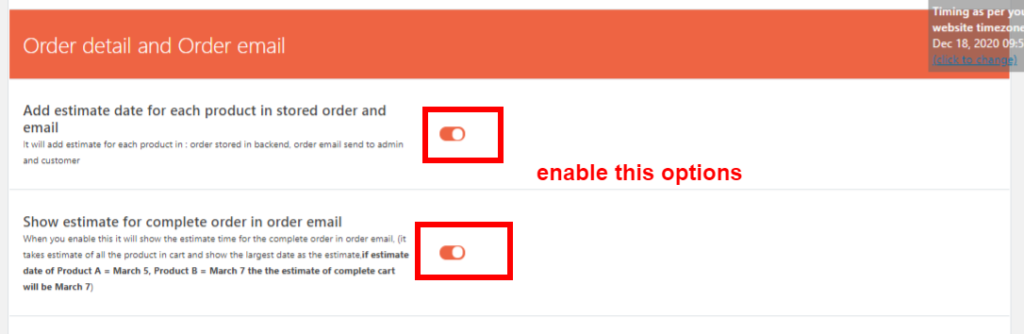
Insert the estimated date in order detail:
This only available in PRO version 3.0.3 and above, once you enable this option all the product estimates will be included in the order details and order email. By default this option is disabled.

Select days of the week when your shipping is closed:
Say your shipping company gives you a shipping estimate as 7 Working days, Now they say they don’t work on Sundays, so our plugin gives you the option to select Sunday, so it won’t be counted in calculating the estimated date. You can select other days as well, say your company doesn’t work on Friday then you can select that as well.

Last shipping time of the day: (PRO)
Say, you ship product every day and your last shipping time is 2 PM after that, you don’t ship product, you ship them the next date. So using this option you can set that time say your set it 2 PM, So when a user comes to your site before 2 PM they will see the estimated date as counted from today (as you can ship the product today). And when a user comes to the site after 2 PM they will see the estimate counted from Tomorrow ( as you cant ship product today as the last shipping time is gone past that was 2 PM).
If you leave this blank then it will count the estimate time from tomorrow

Advanced setting
Single product page setting
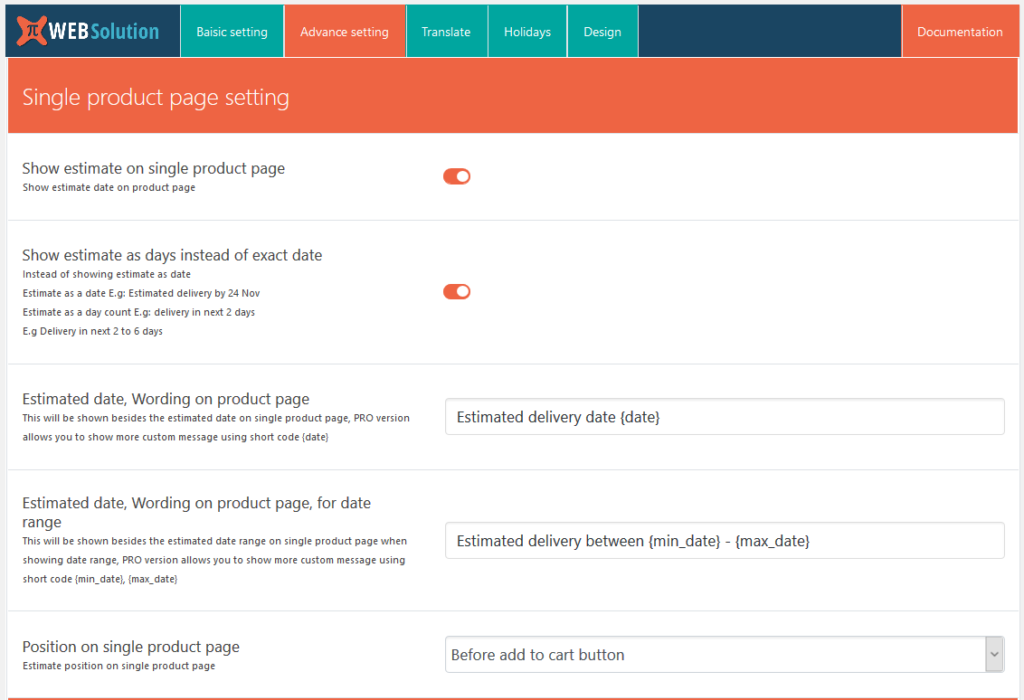
This portion controls the visibility of the estimate on the single product page and the text message that will be shown with the estimates.
Show estimate on single product page
This is self-explanatory, it allows you to show or hide the estimate on the single product page.
Show estimate as days instead of the exact date (PRO)
Using this you can show estimates as days count instead of showing the exact date. Suppose today is 22nd April and your estimated delivery date comes as 26th April
When this option is enabled it will show like this
Estimated delivery as days count {days} days
Estimated delivery as days count for minimum days {min_days} days
Estimated delivery as days count for maximum days {max_days} days
Estimated delivery by {date} days
For this your message you will get like this
E.g: Estimated delivery by 4 days
If this option is disabled it will show
Estimated delivery by {date}
For this your message format you will get like this
E.g : Estimated delivery by 24 April
Same goes for the range {min_date} and {max_date} will be replaced by there days count


Estimated date, Wording on product page
For Free version & PRO version till 1.0.1: This allows you to change the text of the message shown along with the estimate, but it appends the date at the end of the message

E.g: Estimated delivery date is 2019/03/23
You can change the left-side text that is “Estimated delivery date is”. but you can’t have a date in between the text
Pro Version: Pro version allows you to have the text in the middle part of the text as well. Pro version has a syntax {date} this {date} will be replaced with the estimated date on the front end

E.g: Estimated delivery date is {date}, So buy now.
On the website, it will be shown as “Estimated delivery date is March 27, So buy now. “
Estimated date, Wording on the product page, for the date range
This is similar to the Estimated date, Wording on the product page, the only difference is this is used to show the range of best and worst estimate date.
FREE version & pro till 1.0.1: It allows you to change the left side text only
E.g: Estimated delivery between 2019/03/02 – 2019/03/20
PRO version: It allows you to change the complete text along with the position of the best and worst times. It has two shortcode for best estimate date as {min_date} and worst estimate as {max_date}
E.g: Estimated delivery between {min_date} – {max_date}
Position on single product page
You can set the position of the estimate on the single product page using this. At present, it offers 2 different positions. After adding to cart button and Before add to cart button
Shop / Category page setting
This is exactly the same as “Single product page setting” the only difference is this applies to the estimate shown on the shop page or category page
This has got 3 different position for the estimate, After title, After Image, After price


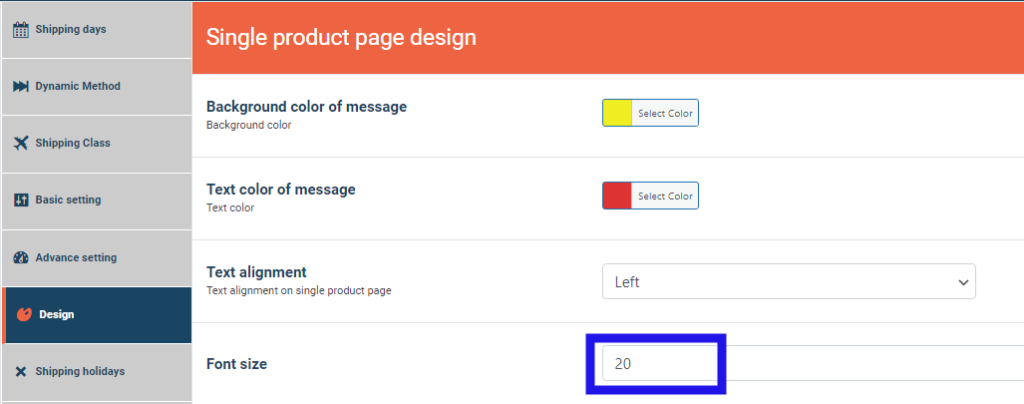
Design
This has setting to change text and background color, it has different setting for Single product, Shop/Category page and Cart page

Translation (only for PRO)
You can add translation to all the estimated message that is shown on the front
Our translation is based on WordPress core, so it will work with any translation plugin that you use like WPML, Polylang, or any other
Our plugin detect WordPress language and searches in the translation to find if a translation for that language is there, if the translation is there it will be used, or else the message string that you have entered in the “Advanced Setting ” tab will be used for the message

Showing estimate date for dynamically added shipping methods
This feature was added in the version v4.7.2.9
How to show estimate date on custom position on product page
- On the product page, you can use the shortcode [estimate_delivery_date] to show the estimated message
- Once you added the estimated message using the shortcode you need to disable the auto insertion of estimate on the single product page from the plugin Advance setting

The estimate is only showing when I am logged in as admin
Please follow the steps 1 to 5 of this steps click to go to steps
How to Change the font size of the estimated message?
You can change the font size by adding the below CSS in your site
Appearance > Customizer > Additonal CSS
.pi-edd{
font-size:16px;
}
Translation issue in WPML
If you are using WPML and product page estimate message are not getting translated properly then while using AJAX loading then you need to enable this setting in the WPML
By default, WPML does not set the language cookie for site visitors that are not logged in. For this purpose, you can manually enable a language cookie that supports AJAX filtering.
To enable language information for the front-end AJAX calls, go to the WPML -> Languages page and scroll down to the Language filtering for the AJAX operations section. There, check the Store a language cookie to support language filtering for the AJAX option.

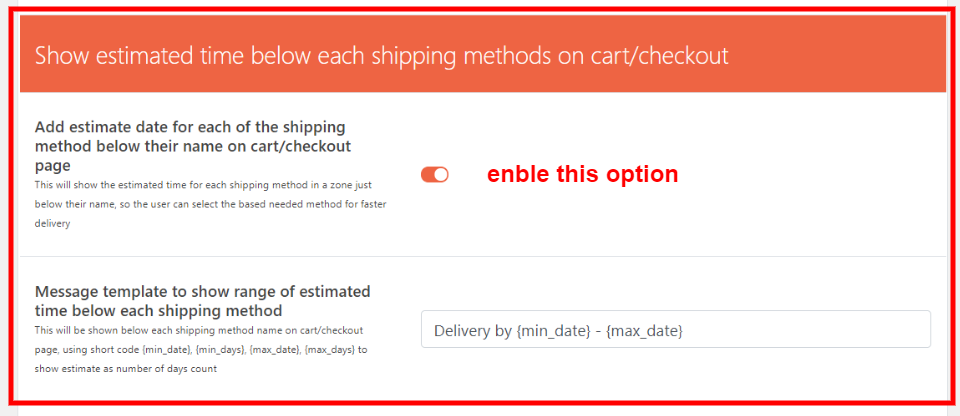
Show estimate time below the shipping method name
Go to Advance settins tab in the plugin
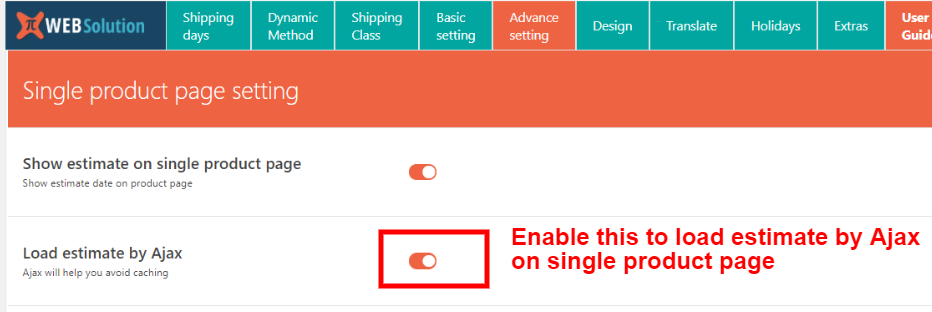
Ajax loading of estimate date on product page
When you are using page caching it is recommended you load the estimate on the product page using Ajax, else it will show the wrong estimate on the product page
To enable Axaj loading of estimate go to the Advance settings tab in the plugin and activate the “Load estimate by Ajax” option
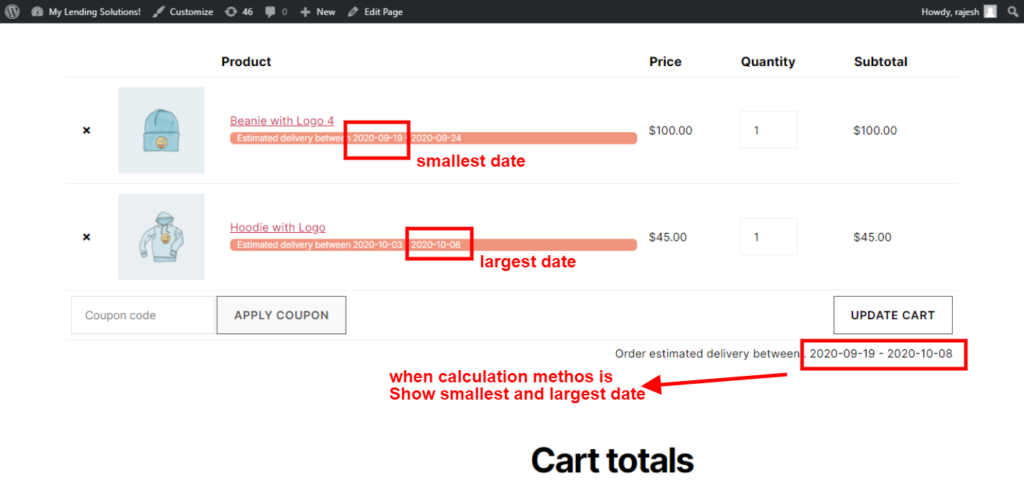
Overall order estimate date calculation option
There are 2 different ways in which the overall order estimate can be calculated, based on the way you do shipping.
Show smallest and largest date: if you do multiple shipping for an order (say customer ordered 2 product in an order with different preparation time and you are going to ship the 2 product separately ) in such case this option is fit for you as it will show the Order estimate date as the smallest date and largest date of all the product in the order.
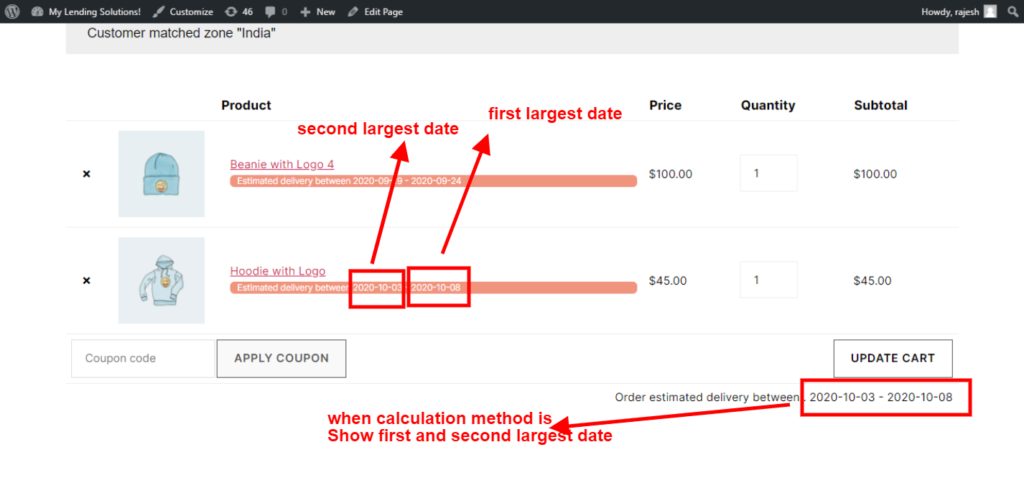
Show first and second-largest date: If you are going to ship all the products of a single order in the same one shipment in such case you will need to use this option. This will show the First and second-largest date (from the product estimate dates) as the Order estimate.
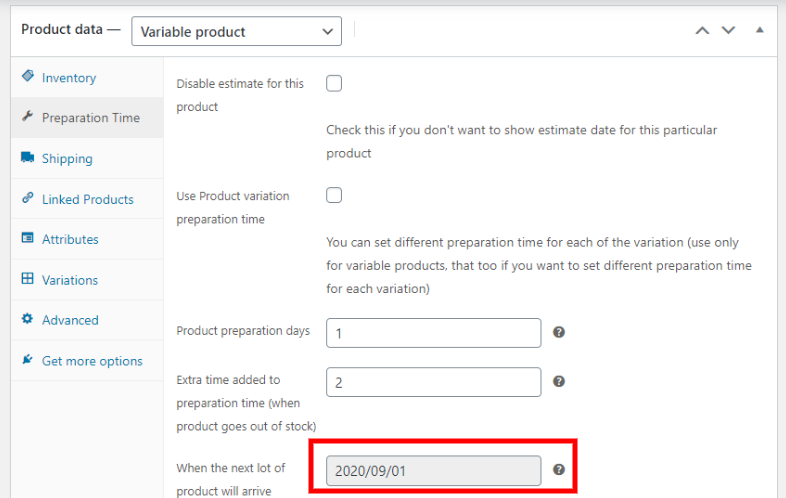
Out of stock product (Available on backorder)
When a product is available on backorder, you can show a different estimate for such a product.
Estimate of backorder product is calculated in 2 different format:
(Shipping days will be added extra in both this method as per the shipping zone and shipping method)
- Out of stock preparation time: When the product is on backorder, then this out of stock preparation time is added to the normal preparation time to give you the new preparation time. Which is used for calculating the estimate.
- The exact date of product arrival: If you know that the new lot of the product is going to arrive on say some future date 23rd Nov then you can add that date. when the Lot arrival date is present and it is some future date and the product goes out of stock (available on backorder) in that case the estimate is that lot arrival date plus the product preparation days. when that date is not specified or that date becomes some past date then the estimate is calculated based on the “Out of stock preparation time”.
If you forget to change the Lot arrival date you need not worry as the plugin will not use that data if it is gone past the present date and it will do the estimate calculation using Out of stock preparation time
You can even specify different arival date for each of the variation as well
The update is shown on my dashboard but updates not happening
The plugin will only give you update notification, it will not update to update you need to download the update package from your account and install that
if you are using WordPress above 5.5: then you have to install the update like you install any new plugin from a zip file and it will update the existing version on your site
if you are using WordPress below 5.5 then you will have to uninstall the old version and then install the new version (You will not lose any setting while doing this)
How to show differtent estiamte date for each variation in variable product?
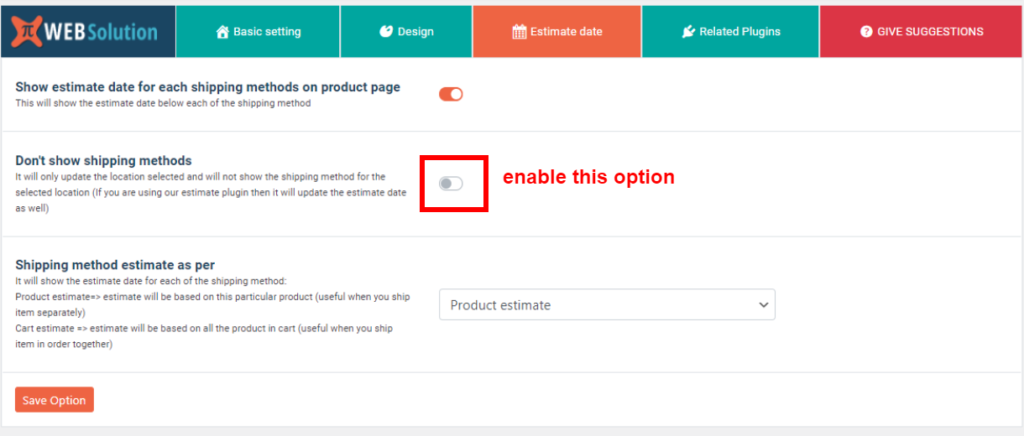
Allow user to add the address on the product page and get an estimated date
To allow user to insert there address on the product page you need to use our free addon plugin
This addon plugin allows customers to add their location on the product page and based on that inserted location it updates the estimated date. This plugin will show all the shipping methods available for that location on the product page along with the estimate for each of the shipping methods. If you don’t want to show all the shipping method for that location and just want to use it to take the location and show estimated date then you can do that as well
for that you need to go to the Woocommerce > Shipping calculator > Estimate date (see below screenshot)
What is troubleshooting option?
Trouble shooting option helps you to find out this 2 issues:
- If you are not seeing estimate date
- If you are seeing estimate date based on the Default min, max shipping days setting
The above 2 issues only happen when you have not configured the Min, Max shipping days for some of the shipping method in your site. This trouble shooting option helps you to find out all the shipping method in your site for which you have not configured the min, max shipping days.
This is how trouble shooting will work, You have to enable the Log process in your site this log process will keep monitoring your site for all the shipping method as customer browser through your site. Whenever it will find any shipping method for which you have not set min, max shipping days then it will log the name of that shipping method.
Even you can go to your checkout page and try to get all the shipping method to show up, and the log will record all the shipping method which are not configured
After some time you can go to the Troubleshooting page in backend and it will show the name of all the shipping method that you or your customer cam accross which did not had shipping days configured in them or which where using Default Min, Max shipping days
Bulk Insertion of Min, Max preparation time for the products
How cutoff time affect the counting ?
if you are receiving the order before cutoff time in that case the Today’s date is also counted as one of the shipping day
and if the order is comin after cutoff time then the counting of shipping days start from next day onwards
So if you have shipping days set to be min 1 day and max 2 days
Before cutoff time: the estimate date will be Today and Next day
After cutoff time: the counting will start from Next day onward so the estimate will be Next day and Day after tomorrow
How to change the font size of the estimate message ?
Go to Design tab and over there you can set a different font size for product page and category page.
I have large number of products in my website how can I configure Preparation days for large no. of products?
We have two option for this
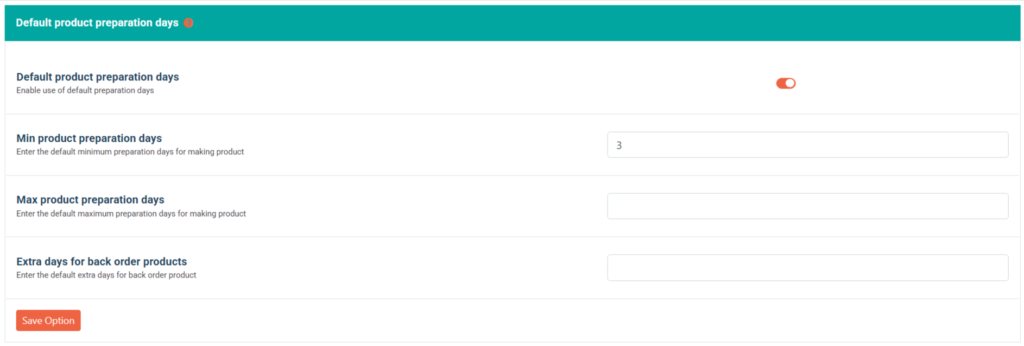
Global Preparation days and Backorder days:
Go inside Shipping days Tab and over there you can configure Default product preparation days and backorder days. This default values applies for all the products in your site, and if you want to configure a different value for some product then you can configure different value in those product from the product edit page.
Bulk editing option:
You can configure product preparation days and backorder days from WooCommerce bulk editing option as well. Here is a video link explaining its working.